All too often I keep Googling this procedure to sign into SSH terminals with certificate keys since I’ve been switching to Linux for development. Like my previous post on how to Create a Bootable USB Drive with Windows, I felt it was time to write my own step-by-step guide for my future reference.
First, let me explain why I do this.
Why use SSH keys to login?
Everyone knows you log into Windows and Linux machines with a username and password. The obvious issue is, what happens when someone gets your username and password? Yep, they can now login.
What if there was a way to sign your specific machine, say your desktop, to only allow connections from it? Then, combine that machine signature with yet another password (called a passphrase) for an impromptu two-factor authentication to login? (Factor 1, the certificate key; Factor 2, your passphrase)
That is my take on why I use SSH keys to sign into Linux machines. You not only need my password; but, you also need my certificate.
Other Reasons to use SSH keys for logins
There are other reasons to use SSH keys for logins. I also use them for script automation across multiple Linux machines, in which the script needs to log into the remote machine to perform commands. The easiest way to do that is to not use a passphrase, then the user account that the script runs under will have the ssh keys added allowing them to remotely signin. Less secure, but also less of a headache to setup. You can still use a passphrase in your scripts, and even encrypt it so it isn’t in the clear text. That is beyond this post though.
Ok, enough with reasoning – let’s setup PuTTY now.
First, the PuTTY Quirks
PuTTY is a great app for Windows. It’s GUI though is a little odd and takes some getting used to. Specifically, it is a bit quirky around the Sessions, aka Profiles that allows you to save settings for quick connections in the future (just select it, click Open and that’s it). Unless you hit Load, Save and Delete in the right sequence, things won’t be loaded, saved or deleted.
Because of this, I recommend setting up your Session profile first before we get started with SSH keys. Nothing worse than going through all the steps to create a Session profile, and missing one step, having it all wiped out to start over.
Create and Save a PuTTY Session profile
Here’s the steps I take to create a Session profile.
- Open PuTTY and you should be in the Session category on the left.
- For the
Host Name, enter the DNS or IP address. E.g. mylinuxvm.cloudapp.net - Make sure
Port 22andSSHoptions are set (usually the default).
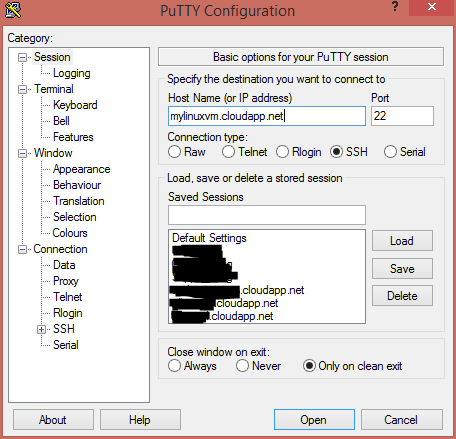
- Set a default
Usernameto login with by clicking the categoryConnectionthenData. Enter your username in theAuto-login usernametext box.
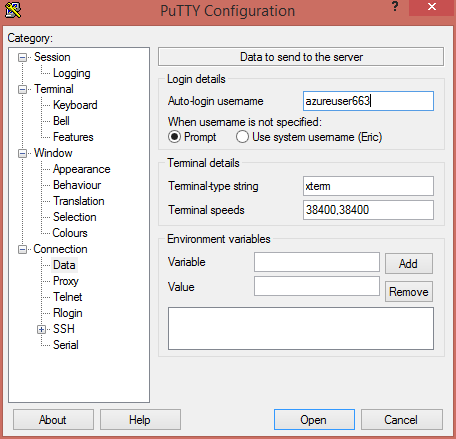
Finally, to save your Session profile, click back on the Session category on the left. Then under the
Saved Sessionstextbox, enter a name for this session. I like to call my sessions the name of my VMs, e.g. mylinuxvm.cloudapp.net.Now, press the Save button.
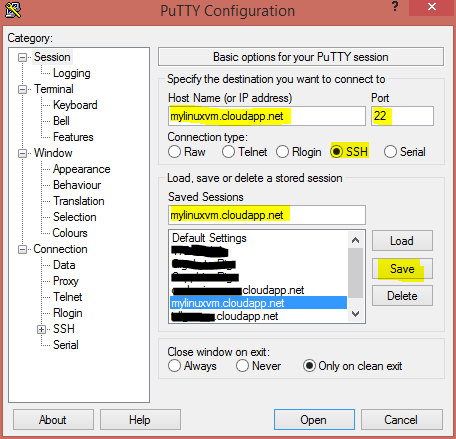
You have now created your first Session profile in PuTTY. It’s usually during this Save process that I may inadvertently click on one of the existing Saved Sessions, in which your profile is now completed wiped out and you have to start all over.
It is now time to generate your Public and Private key pair that you will need to setup on the remote Linux box.
Generate a PuTTY Public/Private Key Pair
The next step is to generate the key pair that you’ll configure your shell to use. We do this with PuTTY’s included PUTTYGEN.EXE file in the directory of where you installed/unzipped PuTTY to.
Running PUTTYGEN.EXE opens a new window.
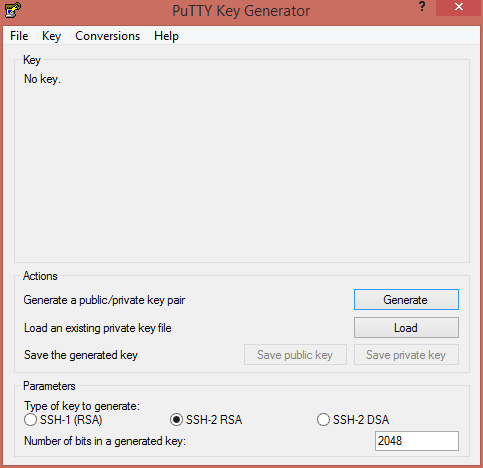
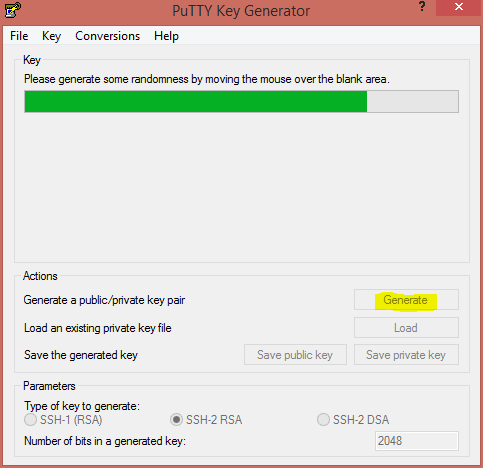
You will need to Generate a new public/private key pair and save both the public key and private key separately to continue. Start by clicking the Generate button, and move your mouse around to generate a random key.
Once the key pair has been generated, you have a few options. It is highly recommend to change the following:
- Change the
Key commentto be your email address, or machine name. - Set a passphrase, you will use this as your password when connecting each time.
Now, it is time to save the Public key file and Private key file. Click the buttons and save each file in a safe place.
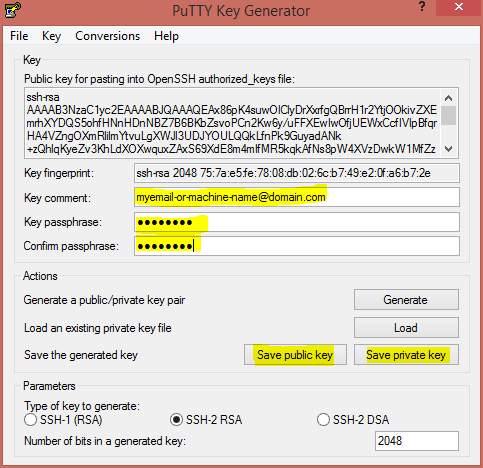
CAUTION: If you are going to disable password logins for your box, and only allow SSH key logins, you will want to keep the private key in a very safe, and backed up, place as if you loose it you will loose access to the machine.
Take the Public key, and assign it to your Linux box
Now it is time to copy the contents of the Public key file and place it on the remote server.
Load up PuTTY again and click on your Saved Session, then click Open. Enter your normal username’s password when you setup the Linux box when prompted – do not enter your Passphrase just yet. If prompted for the security warning, click Yes as it is your first connection to the server.
You are going to create an authorized_keys2 file in your shell, and copy your public key text directly into it.
For this, I am going to assume you already have an ~/.ssh/ directory. If not, just create it:
1 2 | |
Now, create the file:
1
| |
You must now paste the entire Public key, all on one line, here within the editor. Again, make sure it is all on one line. It should look like this:
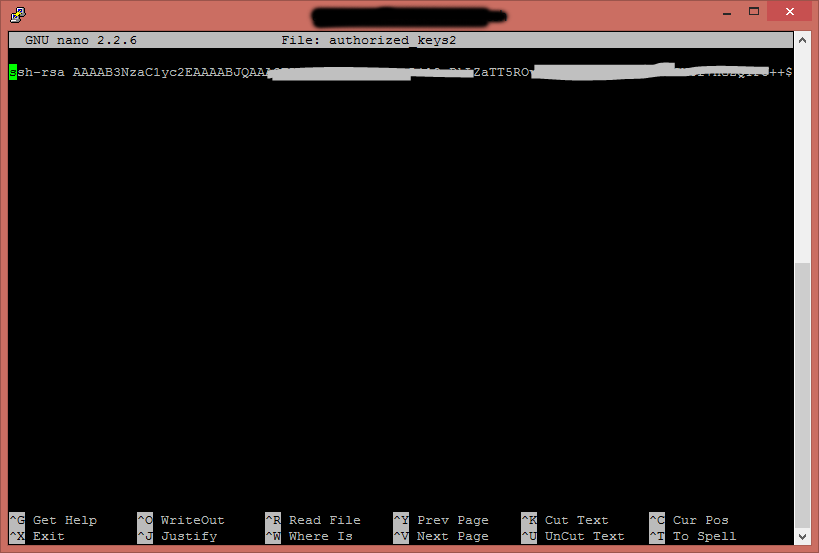
In Pico (now nano), press CTRL-X to exit. It will ask you to save, press Y and you are done.
It is recommended to set the permissions read/write for your user only. To do this, execute the following:
1
| |
Type exit or close your PuTTY, you are done with the shell.
Set the Private Key in your PuTTY Session Profile
Remember that Session profile we first created at the beginning? Now it is time to set it up to use your new public/private key.
Open PuTTY yet again and when prompted for which Saved session, we have to be a little careful with the quirkiness. You will want to Load the Saved session first, before we can modify it.
Select your Saved Session you previously created, and click the Load button.
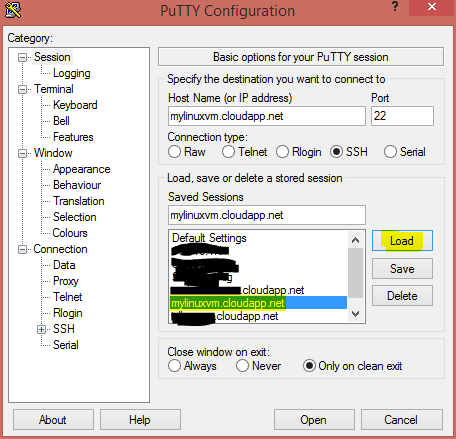
Then on the left, click the Connection -> SSH -> Auth category.
Click the Browse button and select the previously saved Private key this time.
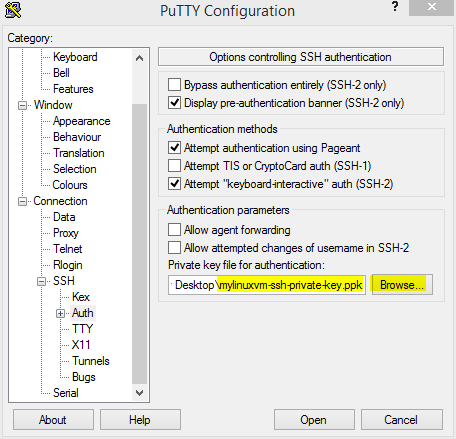
Almost done, you need to go back and Save your Session profile again. Do this by clicking the Session category on the left again.
Simply press Save here. Do nothing else. Do not click on your previous Saved Session, as this will erase what you just changed. Do not reload it, as that will erase it again. Yep, PuTTY quirkiness. Just click Save and you are done.
Completed. Now, connect.
Now it is time to test it. Click on your Saved Session, and click Open. You should be created with something similar to this:
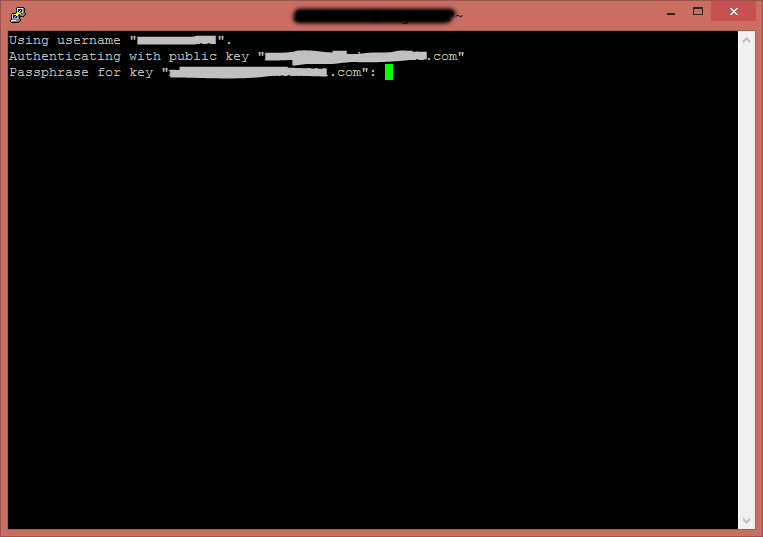
Enter your passphrase you setup at the beginning of this guide, and that should be it.
Final Thoughts
While it is not recommended, you could skip the passphrase creation and leave it blank. This can give you a kind of auto-login when connecting. But do note, anyone who gets your private key file can log into that shell with no password as well.
You are also able to setup multiple public keys for a single shell account by adding additional lines to that authorized_keys2 file – one per line. This can help segment control to multiple parties logging into the same machine (say a dev ops team that deploys – each member gets their own public/private key pair to use). That way, you can reject a login at a later time by simply removing the line from the authorized_keys2 file.