Google and the community have jumped in with both feet with the AIY Projects release and the Voice HAT kit from MagPi, submitting dozens of PRs and updates to both the Google Assistant SDK and Voice Recognizer projects.
config/voice-recognizer.ini.default
)In addition, the Google Assistant SDK has been updated to support:
Before we get started, a quick refresher for those new to the projects.
Google has jumped into the A.I. World of Amazon’s Alexa and IBM’s Watson with their own version called the Google Assistant. The difference being Google brings strong search, wide integration and an open SDK.
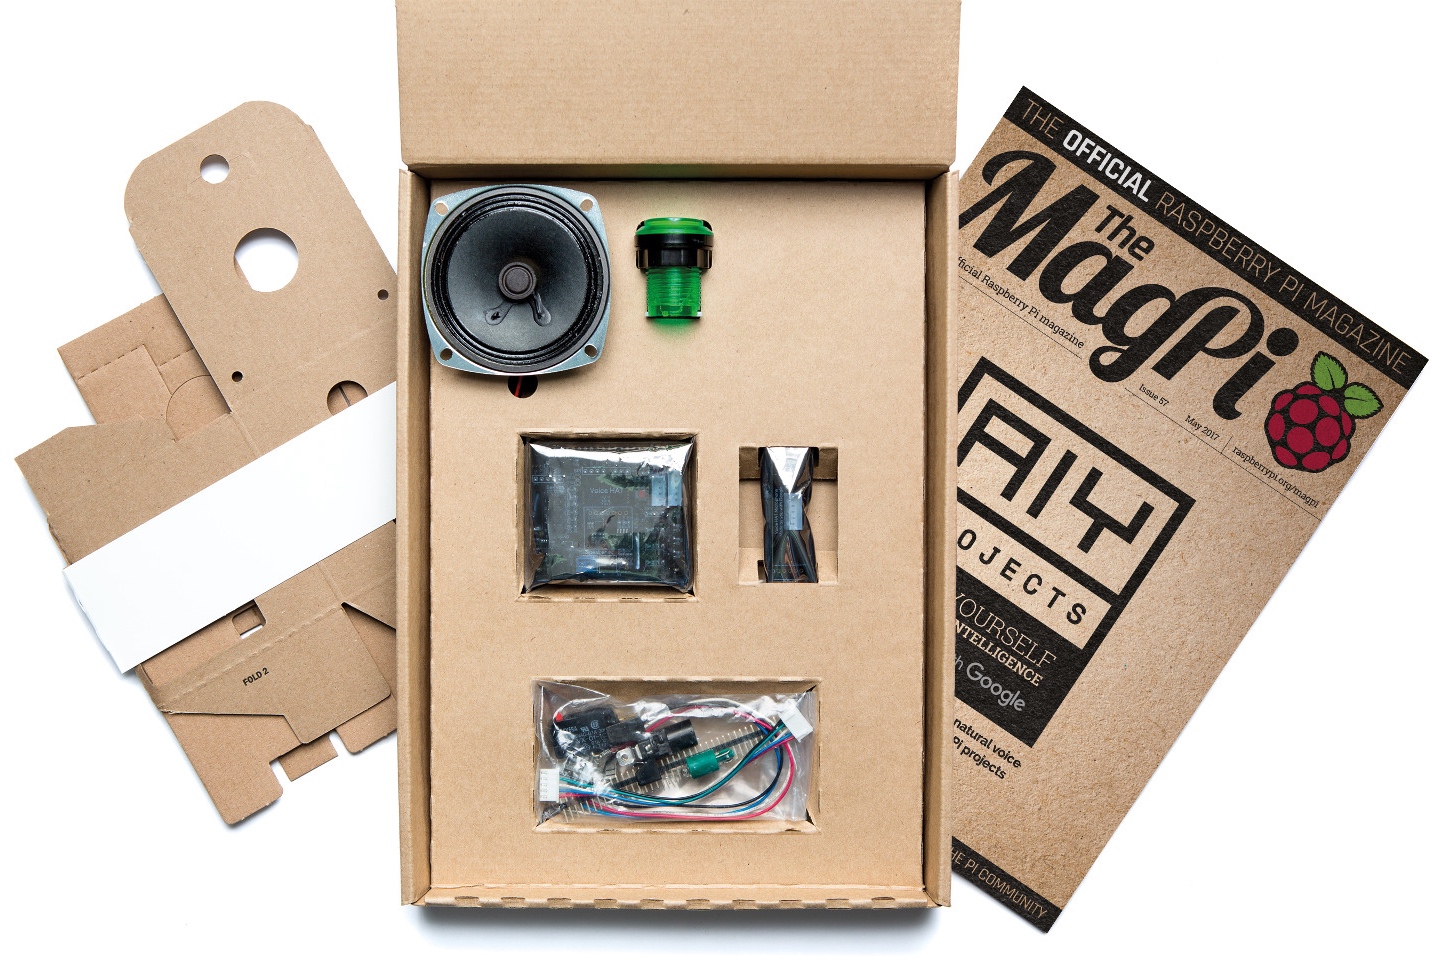
Google and the magazine MagPi teamed up to produce a simple AIY project called the Voice Kit, which is cardboard cube that houses a Raspberry Pi and a number of components. What’s even more cool is everything that was included with the kit, which came free with the MagPi magazine!
The only things required was a Raspberry Pi (I used a Pi 3), a power adapter and a microSD card – standard things you should have laying around if your are a Pi guru.
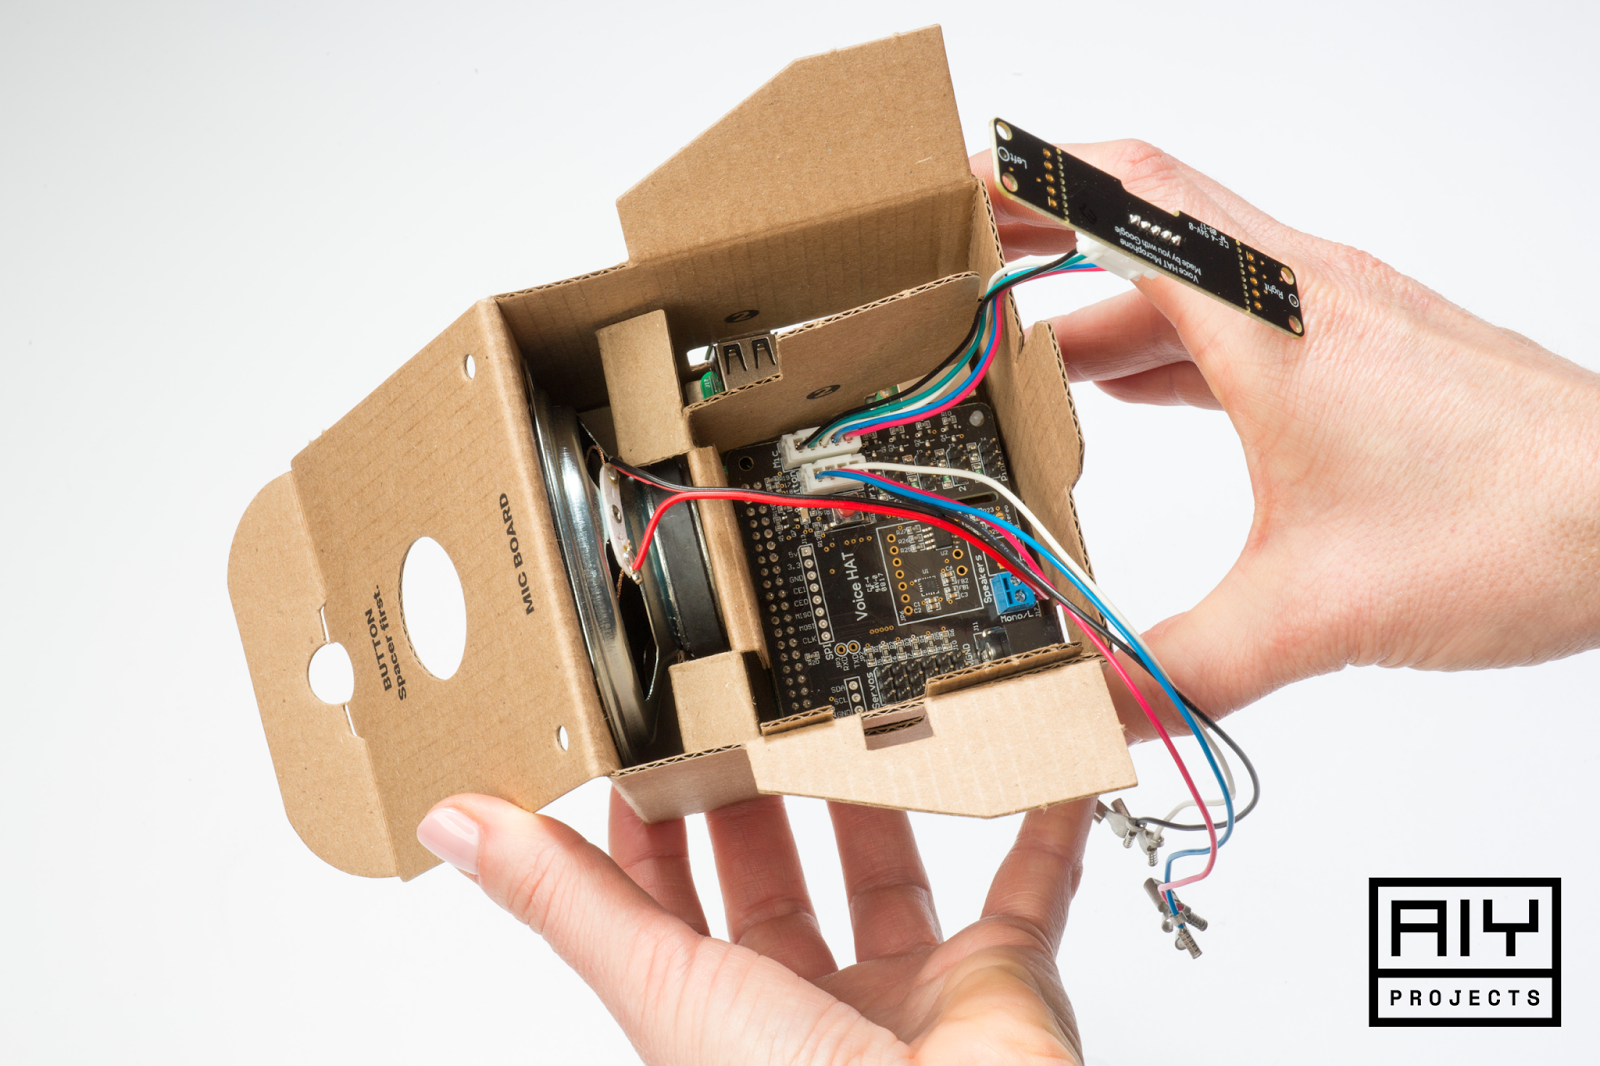
HAT stands for Hardware Attached on Top, which are devices you simply attach directly to your device.
The Voice HAT that is included with the Voice Kit, part of the AIY Projects noted above, is impressive that it was free. It has several GPIOs available on it, along with several soldered on connectors. Hardcore Raspberry Pi gurus have balked, “come on, a button and LED?” But really, Google is targeting a younger audience with these components to make it an easier barrier of entry into the world of embedded devices.
Essentially, this Voice HAT makes it really easy for anyone to get involved. If only the SDKs and code were as simple (see upgrading below).
Google released a new SDK recently called the Google Assistant SDK. The tag line reads:
Bring hotword detection, voice control, natural language understanding, Google’s smarts, and more to your devices.
Currently the only SDK available seems to be Python, and only for Raspberry Pi. But Google has said they are committed to supporting several mainstream hardwares and other languages in the future.
Now back to the updates for May 2017.
If you want to be on the bleeding edge to enable these updates, be
aware that pulling down the latest source code from the master branch is risky.
It can break the entire setup, forcing you to reinstall everything from scratch.
I have noticed the devs adding c.i. travis, coverage and tests, which really
helps stabilize it. But be aware, something could still slip through.
These are the instructions as of late May 2017.
So far, here’s what we’ll be doing:
~/assistant-sdk-python
~/voice-recognizer-raspi
Here’s all the scripts in one go. Log into your Raspberry Pi, or use the Start Dev Terminal from the desktop:
# UPDATE GOOGLE ASSISTANT SDK
cd ~/assistant-sdk-python
git checkout master
git pull origin master
# UPDATE VOICE RECOGNIZER (AKA: AIY PROJECTS)
cd ~/voice-recognizer-raspi
git checkout master
git pull origin master
# UPDATE DEPENDENCIES
cd ~/voice-recognizer-raspi
rm -rf env # needs to be rm'd w/current version of install-deps.sh
scripts/install-deps.sh
As long as you did not modify any of the files, those should have ran smoothly.
If you, like me, were tinkering with the src/main.py
and got a conflict,
erase the changes by using git checkout <file>
(make a backup if you want
first with cp <file> <file>~
).
At this point, you should be able to test everything is working:
sudo systemctl stop voice-recognizer.service # if you had it running
cd ~/voice-recognizer-raspi
source env/bin/activate
src/main.py
See if you got the latest SDK by testing the “Timer” functionality:
> "set a timer for 10 seconds"
< "You got it, setting a timer for 10 seconds. Starting now."
“OK Google” needs a bit more configuration, see below.
“Pi reboot” and “Pi Power Off” needs some tweaking. I’ve opened an
issue
suggesting we change the leading word “Pi” to something else, because it isn’t
detected very well. It’s been changed to “Raspberry Reboot” and “Raspberry Power Off.”
There’s been a lot of movement lately. You may want to backup your existing config file and bring over the newest versions, then re-implement your configurations.
# back them up first
cp ~/.config/status-led.ini ~/.config/status-led.ini~
cp ~/.config/voice-recognizer.ini ~/.config/voice-recognizer.ini~
# copy the new ones over
cp ~/voice-recognizer-raspi/config/status-led.ini.default ~/.config/status-led.ini
cp ~/voice-recognizer-raspi/config/voice-recognizer.ini.default ~/.config/voice-recognizer.ini
# open and review the new options
nano ~/.config/voice-recognizer.ini
You’ll notice the new “ok-google” trigger as well as the trigger sound and more.
If you want this automated in the future, add a rm ~/.config/voice-recognizer.ini
to the
upgrade steps before running the scripts/install-deps.sh
file – as this file actually
copies over the latest config files, if they don’t exist.
This process is preferred over the manual method talked about in Raspberry Pi forums. For one, it won’t break your installation by modifying files that will create a conflict if you update the repository to the latest.
There is a pending pull-request to do exactly
this. Considering the current
velocity of the repo, I’d say wait a few more days and then just update per
instructions above.
Once PR #64 is merged
into master, you can switch the trigger to use the hot words. So keep
monitoring that PR and when you see the purple tag say “MERGED”, follow the
instructions above again to git pull
the latest and newest dependencies.
It’s all merged now! Though, it only supports ARMv7 and newer (sorry Pi Zeros and Pi Ws).
After performing all the upgrades above, test the new trigger:
sudo systemctl stop voice-recognizer.service # if you had it running
cd ~/voice-recognizer-raspi
source env/bin/activate
src/main.py --trigger="ok-google"
If you want this to stick, to be persisted for the auto-start services, edit the
voice-recognizer.ini
file as per the original setup docs:
nano ~/.config/voice-recognizer.ini
And make the trigger say “ok-google”:
# Select the trigger: gpio (default), clap, ok-google.
trigger = ok-google
You can only have one trigger with the current project at this time. Feel free to submit a pull request to enable multiple triggers.
Press CTRL-X
and Y
to save. Then restart the service:
sudo systemctl restart voice-recognizer.service
Now, speaking “OK Google” or “Hey Google” should work.
Try having a conversation with “Hey Google” to confirm the SDK continues your follow up questions:
> "Hey Google, how far away is Japan?"
< "Japan is 6,000 miles away as way of the crow flies."
> "Hey Google, and from California?"
< "Japan is 5,000 miles away from California"
Notice how the SDK remembered you previously searched for the distance of Japan? This was a feature that Google announced back in 2015, contextually aware searches of continued searches. And it has been brought over to the Assistant SDK.
Try the Trivia Game for a long extensive test of the conversation feature:
> "Hey Google, let's play trivia!"
I didn’t know wolverines could climb trees.
If you want it running all the time to let the family play Trivia every morning, set your services to start on boot:
# UPDATE AUTO-START SERVICES ON BOOT (optional)
cd ~/voice-recognizer-raspi
sudo scripts/install-services.sh
sudo systemctl start status-led.service
sudo systemctl start status-monitor.service
sudo systemctl start voice-recognizer.service
sudo reboot
Wait about 30 seconds and see if the button starts flashing again.
You gotta love Google’s Cardboard VR gimmick when they came out. People were paying $1000 for VR headsets, and here’s Google with a $15 kit to do the same. Sure, the experience is better on the $1000 kits (I myself have spent a lot of time with the HTC Vive). But there’s something about going back to that cardboard clip on that makes you feel like Google enjoys shaking up industries.
And here we are, with Google jumping into the A.I. devices with a bottom-dollar hackable entry that anyone with a few bucks can run out and pick up.
Though, updating it, especially for non-Python gurus, is a PITA and subscribes most people who can only enjoy this to a very small niche of developers, who happen to know Python and git.
Feel free to reach out in the comments for help.
Hopefully by the time you read this and try to implement the changes, they will have fixed all the missing dependencies. If not, continue below for some hints on how to fix them.
Remember to activate your env/bin/activate
before doing any of this, to keep
it in the same virtualenv.
cd ~/voice-recognizer-raspi
source env/bin/activate
This keeps everything installed in the original location that the
install-deps.sh
file put them. Don’t worry, it’s a Python thing.
I had to install the latest SDK to get the hot word detection fixed working in the initial testing of the branch by drigz:
pip install --upgrade https://github.com/googlesamples/assistant-sdk-python/releases/download/0.3.0/google_assistant_library-0.0.2-py2.py3-none-linux_armv7l.whl
That was 2 days ago. As of now, it is part of pypi (part of the normal dependency chain). So it should be fixed and you shouldn’t have to do this.
You may eventually see some import errors like this:
$ cd ~/voice-recognizer-raspi
$ source env/bin/activate
$ src/main.py
Traceback (most recent call last):
File "src/main.py", line 32, in <module>
import tts
File "/home/pi/voice-recognizer-raspi/src/tts.py", line 24, in <module>
import numpy as np
ImportError: No module named 'numpy'
Running the dependency chain that Google supplies should be the first step.
cd ~/voice-recognizer-raspi
scripts/install-deps.sh
If you continue to see import errors, than try to install them. They seem to be good at picking very reliable dependencies.
pip install <module-name-from-the-ImportError>
For example:
$ pip install numpy
Collecting numpy
Downloading numpy-1.12.1.zip (4.8MB)
100% |████████████████████████████████| 4.8MB 60kB/s
Building wheels for collected packages: numpy
Running setup.py bdist_wheel for numpy ... -
done
NOTE: Numpy takes like 20 minutes to compile on a Pi3. You’ll have to sit and wait.
Hopefully that continues to fix up the missing deps.
]]>I am writing this jamming away on my Macbook Pro 15” connected to three external 1080p 120 Hz 3D monitors, my precision mouse and CODE mechanical keyboard. Once running ArchLinux for over a year, I’ve recently went back to OS X purely for the user experience. I miss my Arch installs; but, I don’t miss the annoyances around docking/undocking my tri-monitor setup and switching from HiDPI and my 1080p monitors. It was a painful experience when disconnecting and reconnecting.
I also ran Windows 10 natively on it for a few months as I got annoyed at VMware crashing Arch all the time. I was doing my C# Mono work in my Linux VM anyways and not natively on Windows. Battery life sucked with the VM though.
OS X just nails HiDPI perfectly when docking and undocking, switching primary monitors, etc.
No. The real reason I am interested in Linux on Windows is:
I have a 4.8 Ghz hex-core, 5300+ GPU core gaming beast of a machine (also connected to those same 3 monitors) just sitting idle, unused for months. ArchLinux natively on that Asus motherboard was ok; but, I miss my Windows games and no longer could control my TEC waterchiller (it was Windows software I wrote for it).
All Windows was missing was my GNU Linux tooling. I spent the better part of a week replacing all OS X versions of the tools (sed, ack, grep, etc) with the real GNU versions. OS X has Homebrew; Windows now has WSL.
To have the ability to have Linux natively available on Windows is just perfect for my desktop machine.
I only develop using NeoVim + Tmux anyhow; so, I don’t need GUI or Windows
interactions. I just need bash and proper screen redraw with 256 colors.
That’s it.
It was suspiciously awkward that nothing made note of its availability; not from the keynote nor from Hanselman’s and MSDN’s introduction blog posts. All that was said was that the Windows 10 Insider Preview refresh released in January 2016 contained this new WSL platform, and that the bash tooling would be released for it soon. There was even a Windows Insider/dev that noticed the new WSL binaries/framework available back in January, before it was announced.
So a few of us kept poking and prodding at our MS resources, trying to get our hands on it.
It turns out that you have to take a few initiatives to get your system ready for UML. This experience has taught me the new way in which MS will be releasing features into Windows going forward.
First, you can’t install it on your existing Windows 10. Not for some time, not until it is ready for public consumption. Currently Microsoft has said it will be part of the Anniversary build due out this summer.
This post is about getting access to the Insider Preview edition, before it is released.
Here’s the overview of what you need to do:
You should end up with a slider, asking you to Choose your insider level. Like this:
Move it all the way to the right, for Fast.
The next series of mouse-contortions is to turn on Developer Mode.
You should be able to run Windows Update and see that Windows 10 Insider Preview 14316 is available.
Download and install. You may want to go make some tea.
Another set of mouse-ninja-moves is to add the Bash features:
If only we were done. We now need to download and install the Bash on Ubuntu on Windows desktop application, which currently seems to be done via a “bash” command line utility.
Once rebooted, you now have a new Desktop app you can launch called Bash on Ubuntu on Windows
I thought once I hit “y” to install bash, I was in bash. It sure seemed like it but I had a few issues poking around. I went ahead and rebooted and noticed a new app was installed.
A number of things weren’t working with my default installation. I’ll work on those and will update this post, or create another walk-through.
Stay tuned!
]]>.vimrc
to
the never reaching goal of perfection.
Now that I have my plugins and environments setup, I recently enabled a setting
to help me find my cursor faster in my .vimrc
file.
set cursorline
I was warned in the vim documentation that “Will make screen redrawing slower.” Little did I know just how slow it would make it crawl! I first noticed it with neovim. To confirm it wasn’t neovim itself, I attempted to load vim with the same config and oh wow how horrible slow things scrolled. CPU usage of both neovim and vim spiked to 99% on OS X under iterm2 and tmux.
The issue is exasperated when you increase your keyboard’s key repeat and shorten the repeat delay. OS X is not fast enough for me; so, I have to use Karabiner’s Key Repeat feature to speed things up greatly (Delay @ 150ms, Key Repeat at 10ms is just right).
A few quick Google searches surfaced the issue: cursorline
, and similar
cursorcolumn
was the issue when you have a plugin that highlights a bunch of
text. Most people were having issues with Ruby’s code plugins.
I was using vim-go
, and its highlighting, when I noticed the issue.
This Stackoverflow answer is, as the comments say, a lifesaver. Basically it outlines the very reason why scrolling is slow and how to debug exactly what regex pattern is causing it.
You can debug what is slowing things down by first enabling the vim option
called syntime
which is adequately defined as “When scrolling is slow.”
:syntime on
Then scroll up and down a lot, get it to bog down. I also recommend doing this within vim instead of neovim to really make things slow. After 10 seconds or so, generate a report with the following.
:syntime report
For me, here’s the top 10 results when a FileType
of go
was being scrolled:
TOTAL COUNT MATCH SLOWEST AVERAGE NAME PATTERN
2.482624 7066 0 0.009561 0.000351 goInterfaceDef \(type\s\+\)\@<=\w\+\(\s\+interface\s\+{\)\@=
2.476090 7066 0 0.008820 0.000350 goStructDef \(type\s\+\)\@<=\w\+\(\s\+struct\s\+{\)\@=
2.457858 7278 212 0.008375 0.000338 goFunction \(func\s\+\)\@<=\w\+\((\)\@=
2.440439 7066 0 0.007554 0.000345 goFunction \()\s\+\)\@<=\w\+\((\)\@=
0.757577 7180 114 0.001380 0.000106 goInterface \(.\)\@<=\w\+\({\)\@=
0.745827 7104 38 0.001105 0.000105 goStruct \(.\)\@<=\w\+\({\)\@=
0.640945 7064 0 0.004620 0.000091 goSpaceError \(\(^\|[={(,;]\)\s*<-\)\@<=\s\+
0.223065 12827 5910 0.000239 0.000017 goMethod \(\.\)\@<=\w\+\((\)\@=
0.071478 7064 0 0.000128 0.000010 goSpaceError \(\(<-\)\@<!\<chan\>\)\@<=\s\+\(<-\)\@=
0.058679 7064 0 0.000100 0.000008 goSpaceError \(\(\<chan\>\)\@<!<-\)\@<=\s\+\(\<chan\>\)\@=
Immediately you can see it is vim-go
’s regex patterns that is slowing down the
scrolling. Interesting how there were two goFunction
regex patterns caught,
and both are slow.
At first glance, there doesn’t seem to be any big issues with them. Just a lot of matching. Running the first one through regex101.com shows the following definition:
/\(type\s\+\)\@<=\w\+\(\s\+interface\s\+{\)\@=/
\( matches the character ( literally
type matches the characters type literally (case sensitive)
\s match any white space character [\r\n\t\f ]
\+ matches the character + literally
\) matches the character ) literally
\@ matches the character @ literally
<= matches the characters <= literally
\w match any word character [a-zA-Z0-9_]
\+ matches the character + literally
\( matches the character ( literally
\s match any white space character [\r\n\t\f ]
\+ matches the character + literally
interface matches the characters interface literally (case sensitive)
\s match any white space character [\r\n\t\f ]
\+ matches the character + literally
{ matches the character { literally
\) matches the character ) literally
\@ matches the character @ literally
= matches the character = literally
That is a lot of matching in a single regex! Perhaps vim’s regex interrupter is just that bad. I notice a significant speedup when using Neovim over Vim; but, it is still very slow.
Now, I could spend some time debugging this regex, inserting conditionals and groupings in an attempt to limit the amount of matching which should in theory speed that up. But I need to get some work done.
One could just toggle off cursorline
when it is slow and move on and toggle it
back on with the same command later. Set it to a mapped key to make it faster.
:set cursorline!
An option that I found in the help that does speed things up is lazyredraw
.
Though, it is tolerable with Neovim, vim was still a little bit choppy. I have
this enabled as default in my .vimrc
regardless.
:set lazyredraw
Some people have gotten success by disabling syntax highlighting after 128 columns and/or minlines set to 256. Neither worked for my environment though.
set synmaxcol=128
syntax sync minlines=256
Personally, I just disabled some of (but not all of) vim-go
’s syntax
highlighting because I visually value the cursorline
highlighting more
than syntax highlight. Besides, Rob Pike calls syntax highlighting
juvenile.
This option is very plugin
specific; so, your mileage will vary of rather
your vim plugin supports selective disabling of syntax highlighting.
For vim-go
, they have highlighting disabled by default and you must explicitly
enable it. To disable syntax highlighting, just remove what you did to enable it
in the first place in your .vimrc
:
1 2 3 4 5 6 7 8 9 10 11 12 13 14 15 16 17 18 19 20 21 22 23 24 25 26 27 28 29 30 31 32 33 34 35 36 |
|
You can see the three lines I commented out above. I still get plenty of syntax highlighting without it. So I’m good with this for now.
Finally, one could just use more of PageUp/PageDown to move around the file.
]]>Google Authenticator is a two-factor application that runs on your mobile or tablet device. Typically you only run it on one device because the secrets you store in its databases cannot be shared between devices.
In this post, I explain some technical details about this database and how you can exploit the details for your gain (from an Android’s perspective).
So when an Android update comes out, I can not update. I am forced to backup my configurations first, upgrade the device and then restore my configurations after the apps are reloaded. The reason I have to do this is because I run a custom bootloader. I also encrypt my device which further mandates a factor reset upon unlocking and locking to regain root access. What a PITA.
But these annoyances have afforded me the luxury of learning more details about the apps and system processes, along with their configurations.
I use custom bootloaders to gain access to the device in the event of a MMC failure (has happened once, I was able to get important data off of it before it totally was lost).
Encryption is used because, well, I’m just paranoid like that.
Google has stated (insert ref here) that you should not be copying your Google Authenticator’s databases from device to device. This is true as it could lead to you leaking your secrets by, say, copying the file to your cloud storage to sync to another device.
Not only have you given your cloud provider access to your secrets (that is now backed up and replicated on their systems); but, if hackers gain access to your cloud platform (which several have Undelete options!), that’s game over man.
Me? I always copy directly from my device to a USB stick. Do my thing on the device and when ready, push it back from the USB stick to my device. When done, wipe the USB stick (or write an ISO to it, which I do very very often).
So why do I go to such extremes? Google’s very own security supplies a way for you to move your secret (a new secret) to a new device, a process I consider the absolute model of perfection of moving your secrets.
One answer: 17.
I have 17 Google Authenticator “secrets” on my device for 17 services across my personal services and several clients’ access.
Have you ever tried to regain access to an account once you lost your two-factor authentication secret? I have. I have a 2:5 win/loss ratio when I had to play that game. No more.
So, it’s time to hack this thing to take matters into my own hands.
This, ladies and gentlemen, is why I own Android…
If you got Root, then you have more options.
On Android, the Google Authenticator databases
file is located at:
1
|
|
Within this directory is a ‘databases’ file:
1 2 |
|
And no, that’s not a misprint. There is a directory called databases
with a file in it called databases
.
The first dumbfounded thing I found during my first attempt at copying my second version of GA’s databases is the permissions. Take a look closely at the ls
command above. Notice anything?
1 2 3 4 5 6 7 8 |
|
WTF? Everyone has access to this file?
During my first restore, I had Google Authenticator constantly crashing on launch. Come to find out, it did not like my 700
permissions access I first gave it. Only after frustration of the app crashing over and over did I just give it full 777 permissions… And the app opened without a crash? It needs world read/write?
I then found out the parent databases
directly itself needed the same permissions.
Now, I know that Android has some special user-space for each app to isolate each app’s access to the rest of the file system. Perhaps it’s enough to trust Android in that its app isolation is good enough.
I don’t trust anyone with this data; but, unfortunately if you want GA running you have to set the correct permissions at this time:
1 2 3 4 5 6 |
|
The parent databases/
folder, and the databases
file itself requires world read and write access – or the Google Authenticator’s app won’t even open (crashes).
In addition, and what stemmed me to write this post, is I had another issue. I was not able to add any new entries to my Google Authenticator. I had the permissions right, so I thought.
Upon inspection, I could see that the directories surrounding the databases/ directory was owned by a different user. In my case, that userid was u0_a92
.
I am not sure if this was the user space dedicated to this app or not. But in any case, once I set the owner and group to this user, I was able to add new entries:
1 2 3 4 5 6 7 |
|
And now I was able to add new entries.
The databases
file itself is a sqlite
database. This makes it easy to write an application to look at the database and query directly against it.
1 2 3 4 5 6 7 |
|
Here above we can see two tables in this file. An android_metadata
table and an accounts
table.
Run this command:
1
|
|
Did you notice everything is in the clear here? No encryption?
It was so much so that I started to copy and paste my output of 17 accounts; but, it was too much to redact. I figured I’ll just posted the schema above and let you query your own database.
There a few things to take away from all of this.
Google Authenticator has world read/write permissions: Is that a security issue?
Google Authenticator stores everything in the clear in Sqlite: Is that a security issue?
I am going to reach out to Google for comment about this one. But for now, you have the details and know-how to move this file as you see fit. No more having to reset 17+ accounts, just for an Android update!
]]>Heard this on NPR and decided to investigate further because at first glance it looks like a good idea – at least from a developer’s perspective.
From the PaymentNews website, I found this announcement.
Tokenization is the process of replacing a traditional card account number with a unique payment token that is restricted in how it can be used with a specific device, merchant, transaction type or channel. When using tokenization, merchants and digital wallet operators do not need to store card account numbers; instead they are able to store payment tokens that can only be used for their designated purpose. The tokenization process happens in the background in a manner that is expected to be invisible to the consumer.
Visa calls it, VISA checkout and it is supposed to remove the burden of entering a credit card from your smartpohone.
Looking better. But wait a minute, how do you secure/access a token?
Turns out they are expecting users to sign in with a “simple username and password, easy to remember.” And there inlies my first cringe – passwords? Let me explain why that is a roadblock IMO:
Sure, you can mitigate the complex passwords with a password manager. But, not everyone uses those and some would argue a password manager is also a bad idea.
Today if presented with an “enter credit card details below” with an option to “sign in with Visa Checkout instead”, I still enter the raw CC details. Which that in and of itself is the problem VISA is trying to fix by focusing the burden on secure storage of those CC details with VISA themselves, instead of the mom-n-pop cake shop’s PHP website that is asking for my CC.
What I would suggest is to take a more two-factor approach to authentication. Something that involves a simple password, one that is easy to remember; but also, you need to have a second factor of authentication – like a keyfob or fingerprint reader or possibly even, gasp, something as simple as Google’s Authenticator that has worked perfectly for me for many websites and devices.
But sadly, we will continue to be forced to obey the false sense of security of complex passwords.
]]>A flood of comments about net neutrality crashed the Federal Communications Commission’s commenting site on Tuesday, the original deadline for public comments on the controversial Internet proposal. But the tech problems are buying those who want to weigh in some extra time — the deadline for public commenting is now Friday (July 18th, 2014) at midnight.
Thank you everyone for answering my call to crash the FCC.
Well, at least I’d like to think I had a hand in it with my awesome blog posts on the matter. :)
]]>“Our attacks are severe: in four out of the five password managers we studied (LastPass, RoboForm, My1login, PasswordBox, and NeedMyPassword), an attacker can learn a user’s credentials for arbitrary websites. We find vulnerabilities in diverse features like one-time passwords, bookmarklets, and shared passwords. The root-causes of the vulnerabilities are also diverse: ranging from logic and authorization mistakes to misunderstandings about the web security model, in addition to the typical vulnerabilities like CSRF and XSS. Our study suggests that it remains to be a challenge for the password managers to be secure.”
“We found critical vulnerabilities in all three bookmarklets we studied,” the researchers report. “If a user clicks on the bookmarklet on an attacker’s site, the attacker, in all three cases, learns credentials for arbitrary websites.”
“Our work is a wake-up call for developers of web-based password managers. The wide spectrum of discovered vulnerabilities, however, makes a single solution unlikely. Instead, we believe developing a secure web-based password manager entails a systematic, defense-in-depth approach… Future work includes creating tools to automatically identify such vulnerabilities and developing a principled, secure-by-construction password manager.”
I can’t believe we are still talking about CSRF attacks. And for websites claiming to be secured for passwords themselves? Isn’t it a common job interview question by now (or better yet, a coding exercise) for developers in how to prevent CSRF attacks?
Oh yeah, and how most of the common web-based password managers are all hackable. Sure, they fixed THIS vulnerability. Then when the next zero-day is found, it will be fixed. And the next and the next.
I use a password manager. It is not web based, does not integrate into any browser, and still requires manual intervention to open and view – with copy-n-paste only possible in some circumstances which makes the annoyance ever more livable after reading this article.
Can’t wait until next month (August) for the paper to be released.
]]>The numerous incidents of defeating security measures prompts my cynical slogan: The more secure you make something, the less secure it becomes. Why? Because when security gets in the way, sensible, well-meaning, dedicated people develop hacks and workarounds that defeat the security. Hence the prevalence of doors propped open by bricks and wastebaskets, of passwords pasted on the fronts of monitors or hidden under the keyboard or in the drawer, of home keys hidden under the mat or above the doorframe or under fake rocks that can be purchased for this purpose.
We are being sent a mixed message: on the one hand, we are continually forced to use arbitrary security procedures. On the other hand, even the professionals ignore many of them. How is the ordinary person to know which ones matter and which don’t? The confusion has unexpected negative side-effects. I once discovered a computer system that was missing essential security patches. When I queried the computer’s user, I discovered that the continual warning against clicking on links or agreeing to requests from pop-up windows had been too effective. This user was so frightened of unwittingly agreeing to install all those nasty things from “out there” that all requests were denied, even the ones for essential security patches. On reflection, this is sensible behavior: It is very difficult to distinguish the legitimate from the illegitimate. Even experts slip up, as the confessions reported occasionally in various computer digests I attest.
I recall many years ago when Microsoft proclaimed the end of password management woes with long and memorial Pass Phrases. I personally started to really get annoyed at websites that didn’t allow me to enter spaces or the password length was something small like 16 characters.
As a previous IT Administrator, having to reset so many user passwords because they locked themselves out or just plain forgot their had-to-change-ever-60-days password, I saw first hand the annoyances that most had with passwords.
It wasn’t until just a few years ago that the buzz around complex passwords started to shift to a “false sense of security” statue. Which is very true because I have personally brute-force attacked several passwords (in the name of education, of course).
Seeing how fast my X79 6-core desktop with over 5,760 GPU cores could churn through a few billion password combinations to guess a 20 character TruCrypt volume (it took only 4 hours by the way), the era of complex passwords deterring hackers is over – way way over since this hardware can easily be purchased off the shelf by anyone – and I still have room for another 6000 GPU cores if I ever upgraded. That’s just insane – 12,000 GPU cores in a single machine.
Now, some password managers are smart. It wasn’t until I read into KeePass’ protection against Dictionary Attacks did I realize a whole ‘nother way of preventing brute-force attacks. KeePass describes their password hashing like this:
You can’t really prevent these [brute-force dictionary] attacks: nothing prevents an attacker to just try all possible keys and look if the database decrypts. But what we can do (and KeePass does) is to make it harder: by adding a constant work factor to the key initialization, we can make them as hard as we want.
Please go read the rest of that quote for extreme details. But in short, here is what they do:
The trick that makes this work is that N should be a number of cycles that it takes your computer to compute in about 1 second. By default, they set it to 6000 to allow for older mobile phones to be able to open the password database within about a second or two. But this should be much higher. Like, on a factor of 100,000 times higher.
For example, that same 6-core X79 CPU and 5,760 GPU core desktop I used to crack that 20-character TruCrypt could generate about 18,000,000 passwords each second. But, when I opened KeePass and told it to calculate how many hashes it needed to perform to take at least 1 second on this machine, the answer was 23,000,000.
So how does rehashing 23,000,000 times work, you may ask? Instead of my computer generating 23,000,000 passwords a second in a brute-force attack, it follows a pre-determined algorithm hashing 23,000,000 times to generate only 1 password.
I’ll let that sink in for a moment…
If a hackers machine is busy generating only 1 password per second, the possibility of brute force attacking a database goes from 23,000,000 per second down to just 1 per second.
No hacker in the world is going to continue brute-forcing that database. Most likely they will just look for the NSA backdoors available in everything at that point.
I’ll end with a final quote from our buddy Don from earlier.
]]>Although there is much emphasis on passwords security most break-ins occur through other means. How do thieves break into systems? They usually don’t use brute force. They phish, luring unsuspecting but helpful people to tell them their login name and password. Or they install sniffers on keyboards and record everything that was typed. The strength of passwords is irrelevant if the thief has already discovered it.
Well, that’s not entirely accurate. The story started with a used Apple Wireless Keyboard I got from eBay. It paired and worked fine; but, some of the keys did not work. So I bought a new one from Apple.com.
It paired and connected just fine; but, the brand spanking new keyboard did not work. The Nexus 10 would not recognize an additional input device (the small “A” symbol in the top left corner of the screen).
To reiterate, this new Apple Wireless Keyboard ordered direct from Apple.com worked fine with all other Android devices (Android 4.2.2, 4.4.2, 4.4.3 and 4.4.4) and the iPod Touch 4th Gen. It is only this Nexus 10 (Android 4.4.3 and 4.4.4) that it did not.
As I blogged some time ago, not all Bluetooth devices are made equal. Devices implement the Bluetooth stack differently and sometimes miss an implementation detail.
I highly suspect the Nexus 10 has a flawed Bluetooth implementation, causing this incompatibility.
But what exactly is it incompatible with? It worked fine with the previous Apple keyboard I got used on eBay. It works fine with all other bluetooth keyboards I have tried.
Why this one Apple keyboard I got direct from apple.com?
Atlas only after several trips to some local Apple stores did I stumble onto the issue: there are three versions of the Apple Wireless Keyboard that were sold. I found this out by looking at about a dozen different iMacs they had, from old to new. Surprisingly Apple’s newest store located in NYC, in Grand Central Terminal, is the one that had the largest collection of older iMacs – ones that actually had the 2009 keyboard and even one with the 2007 keyboard.
They are identified by their model years. To take a quote directly from Apple’s support site:
* Apple Wireless Keyboard (2011): Features an aluminum case and uses two AA batteries. You can identify this model by the following icons on the F3 and F4 keys:
* Apple Wireless Keyboard (2009): Features an aluminum case and uses two AA batteries. You can identify this model by the following icons on the F3 and F4 keys:
* Apple Wireless Keyboard (2007): Features an aluminum case and uses three AA batteries.
So, we have three keyboards available to us. After many trials and errors, I can safely say…
The used eBay model I got was a 2009 and it worked fine, dispite a few keys not working. The Apple.com model I got was an 2011 with the latest x80 firmware – and it did not work.
You want to focus on the F3 and F4 keys looking like this:
Again, the 2011 keyboard works fine with all other Android devices, even back to Android 4.2 on my Galaxy Nexus. So this is clearly a fault with the Nexus 10’s bluetooth hardware.
But none the less, if you want an Apple Wireless Keyboard to work with your Nexus 10, you better seek out the 2009 model.
And btw, the firmware version of the 2009 I found working at an Apple store has firmware version x50. You can see it under the system’s properties, like this:
I only mention the firmware because I found a number of posts online where people upgraded their 2009 and 2011 keyboard firmwares to the latest, and lost some functionality. I am not sure if the x50 version of the firmware is the latest. I am only stating the exact version of the 2009 keyboard that worked flawlessly with the Nexus 10.
]]>There’s only two days left for comments. At the time I left mine a month ago, there were 65,000 comments. Now, there are 205,000.
The url to file your comments: fcc.gov/comments
The YouTube video hit on every point I’ve been saying in person when talking about this, and many more.
One of my biggest I tell people is how the former chairman of the FCC left (forced out?), and the new one put in place by Obama last year previously ran (as in chaired and commanded) the lobbying firm for Cable and Wireless (e.g. Comcast and TimeWarner) which was directly responsible for the last attempt to create the two-tier system that the FCC blocked. And, that sued the government to force this actual change.
Translation by the current FCC chairman: “We didn’t win last time. Ok, let’s sue the FCC/government to force a rule change. When we win the lawsuit, I’ll step down as head of this lobbyist group and become head of the FCC [so I can force this rule through].”
How fracked up is that?
Also it sucks that NetFlix already has to pay Comcast to get service to its users.
]]>Today I want to share with you my reasons for staying with the format MKV, otherwise known as Matroska, over all of these years in lieu of MP4, MOV, AVI, WMV and so on.
Let me start by stating the inherit flaw of these. I am not going to get into lossless, video quality, etc. There are 1000s of posts on that. There’s also the fight that WMV won’t play on iPads, and the Xbox refusing certain copyrighted encryptions. No. None of that.
Instead I want to focus on 1 flaw they all have in common: they are only a single layer of intermixed streams of video and audio, unable to be separated, switched off, or doubled up.
Think about a standard DVD or Blu-ray movie: You have multiple audio tracks including multiple commentaries that makes you want to watch the movie over and over again (I recall watching Alien (1979) multiple times with Sigourney Weaver’s commentary, Aliens (1986) is even funnier with Bill Paxton’s commentary). Sometimes there are alternative endings to choose from before you start your movie. Other times, you may need foreign subtitles for the parts in another language; or, those foreign subtitles are translated incorrectly, and you’d rather turn them off and interrupt them yourself.
And there in-lies the problem with a single layer of video and audio in the above mentioned formats: whatever is selected at the time of encoding (English, Japanese subtitles, H264 video stream), is merged into a single layer – unable to be manipulated, turned off, or changed.
I prefer freedom of choice.
At the very heart of the Matroska container (aka, file format) is its “layer” approach which gives it the power to encapsulate as many video, audio and subtitle tracks to your heart’s content – all in their RAW format, unmolested by “encoders” that have to remix them into a single stream in the other formats.
Want all 5 audio commentaries for Alien (1979), including the two separate Ridley Scott and Sigourney Weaver tracks? No problem, the MKV container allows you to store as many audio tracks as you like.
Want the alternative cut and ending to The Abyss (1989) in where the aliens are actually here for a different reason (I won’t spoil it here)? No problem with MKVs.
An MKV file can do this because it essentially is just a wrapper around your raw binary streams (or rips) of H264 video, AAC or FLAC audio, and the subtitle text file(s). DVDs and Blu-rays store these streams separately – it is how you can switch audio tracks or alternative endings. It is only natural that you take these raw streams from these disks, and wrap them in a container of sorts (MKV) to have them all at your fingertips to switch video, audio and languages with a click of the button.
Welcome to Matroska.
One of my favorite DVDs is my Peter Gabriel’s – Growing Up Live (2003), a live recording in Milan of his Growing Up Tour in 2003.
What’s interesting about this DVD (I really wish they would release a blu-ray) is that it has interactive camera angles during multiple titles. You are able to “switch videos streams” to a different camera angles. Pretty cool.
With Matroska, I retained these video angles within the single MKV file I created of the DVD when I ripped it. Given though, I didn’t copy the “cue markers” overlay from the original DVD viewing. You kind of have to know when you can change angles, and you can select a different video stream while playing.
This one is especially important to my family. With a spouse of a different nationality, English sub-titles are a near must.
The other formats have to “burn-in” sub-titles on-top of the video, removing the option to turn it off. Yes, many decoders allow you to add an .srt file alongside the MP4 and it will overlay the subtitles (if you get the right one, and if it is in sync with its time codes).
Again, thanks to Matroska’s layers, this is only a matter of adding (or removing, or reording) the subtitle tracks that are part of the MKV layers.
Don’t like the Dutch sub-titles as default? Reorder them, or remove them.
That’s right. No copyright or patents to infringe on. The perhaps most importantly, the container format is very well documented allowing for anyone to create a set of tools themselves.
It is a real shame that the big players ignore this format, and it is up to us end-users to hack our devices to play them.
Having all the video and audio streams alongside the closed caption allows me to convert my backups of MKVs into any format I like in the future.
Once such tool is Handbrake, which is a great free and open source app for converting MKVs into any format. An example is is the Android Tablet profile they have which takes a 15 GB movie and compresses it down to a 1.8 GB file (for the kiddo’s tablet).
Why hasn’t MKV gone mainstream? Why hasn’t one of these companies openly embraced this superior format?
The answer is simple: copyright and encryption. The Matroska format does not support either with its free and open container formats; and therefore, no media partner (MPAA) will ever support a company that openly embraces a format that splays their precious video and audio for all to see and use.
So that leaves me, a lone person, burdened to create my own Matroska MKV containers myself. More cumbersome is the annoyance of getting the MKVs to play on multiple devices in different media centers and tables.
It seems every few years I have to re-evaluate my media devices and setup to ensure everything is compatible. Seems to come around with each new Windows release, since the hunt for decoders and setup starts all over.
Next time, it’s Linux once and for all.
]]>First, let me explain why I do this.
Everyone knows you log into Windows and Linux machines with a username and password. The obvious issue is, what happens when someone gets your username and password? Yep, they can now login.
What if there was a way to sign your specific machine, say your desktop, to only allow connections from it? Then, combine that machine signature with yet another password (called a passphrase) for an impromptu two-factor authentication to login? (Factor 1, the certificate key; Factor 2, your passphrase)
That is my take on why I use SSH keys to sign into Linux machines. You not only need my password; but, you also need my certificate.
There are other reasons to use SSH keys for logins. I also use them for script automation across multiple Linux machines, in which the script needs to log into the remote machine to perform commands. The easiest way to do that is to not use a passphrase, then the user account that the script runs under will have the ssh keys added allowing them to remotely signin. Less secure, but also less of a headache to setup. You can still use a passphrase in your scripts, and even encrypt it so it isn’t in the clear text. That is beyond this post though.
Ok, enough with reasoning – let’s setup PuTTY now.
PuTTY is a great app for Windows. It’s GUI though is a little odd and takes some getting used to. Specifically, it is a bit quirky around the Sessions, aka Profiles that allows you to save settings for quick connections in the future (just select it, click Open and that’s it). Unless you hit Load, Save and Delete in the right sequence, things won’t be loaded, saved or deleted.
Because of this, I recommend setting up your Session profile first before we get started with SSH keys. Nothing worse than going through all the steps to create a Session profile, and missing one step, having it all wiped out to start over.
Here’s the steps I take to create a Session profile.
Host Name
, enter the DNS or IP address. E.g. mylinuxvm.cloudapp.netPort 22
and SSH
options are set (usually the default).Username
to login with by clicking the category Connection
then Data
. Enter your username in the Auto-login username
text box.Finally, to save your Session profile, click back on the Session category on the left. Then under the Saved Sessions
textbox, enter a name for this session. I like to call my sessions the name of my VMs, e.g. mylinuxvm.cloudapp.net.
Now, press the Save button.
You have now created your first Session profile in PuTTY. It’s usually during this Save process that I may inadvertently click on one of the existing Saved Sessions, in which your profile is now completed wiped out and you have to start all over.
It is now time to generate your Public and Private key pair that you will need to setup on the remote Linux box.
The next step is to generate the key pair that you’ll configure your shell to use. We do this with PuTTY’s included PUTTYGEN.EXE
file in the directory of where you installed/unzipped PuTTY to.
Running PUTTYGEN.EXE
opens a new window.
You will need to Generate
a new public/private key pair and save both the public key and private key separately to continue. Start by clicking the Generate
button, and move your mouse around to generate a random key.
Once the key pair has been generated, you have a few options. It is highly recommend to change the following:
Key comment
to be your email address, or machine name.Now, it is time to save the Public key file and Private key file. Click the buttons and save each file in a safe place.
CAUTION: If you are going to disable password logins for your box, and only allow SSH key logins, you will want to keep the private key in a very safe, and backed up, place as if you loose it you will loose access to the machine.
Now it is time to copy the contents of the Public key file and place it on the remote server.
Load up PuTTY again and click on your Saved Session, then click Open. Enter your normal username’s password when you setup the Linux box when prompted – do not enter your Passphrase just yet. If prompted for the security warning, click Yes as it is your first connection to the server.
You are going to create an authorized_keys2
file in your shell, and copy your public key text directly into it.
For this, I am going to assume you already have an ~/.ssh/ directory. If not, just create it:
1 2 |
|
Now, create the file:
1
|
|
You must now paste the entire Public key, all on one line, here within the editor. Again, make sure it is all on one line. It should look like this:
In Pico (now nano), press CTRL-X
to exit. It will ask you to save, press Y
and you are done.
It is recommended to set the permissions read/write for your user only. To do this, execute the following:
1
|
|
Type exit
or close your PuTTY, you are done with the shell.
Remember that Session profile we first created at the beginning? Now it is time to set it up to use your new public/private key.
Open PuTTY yet again and when prompted for which Saved session, we have to be a little careful with the quirkiness. You will want to Load
the Saved session first, before we can modify it.
Select your Saved Session you previously created, and click the Load
button.
Then on the left, click the Connection -> SSH -> Auth
category.
Click the Browse button and select the previously saved Private key
this time.
Almost done, you need to go back and Save
your Session profile again. Do this by clicking the Session category on the left again.
Simply press Save
here. Do nothing else. Do not click on your previous Saved Session, as this will erase what you just changed. Do not reload it, as that will erase it again. Yep, PuTTY quirkiness. Just click Save
and you are done.
Now it is time to test it. Click on your Saved Session, and click Open. You should be created with something similar to this:
Enter your passphrase you setup at the beginning of this guide, and that should be it.
While it is not recommended, you could skip the passphrase creation and leave it blank. This can give you a kind of auto-login when connecting. But do note, anyone who gets your private key file can log into that shell with no password as well.
You are also able to setup multiple public keys for a single shell account by adding additional lines to that authorized_keys2
file – one per line. This can help segment control to multiple parties logging into the same machine (say a dev ops team that deploys – each member gets their own public/private key pair to use). That way, you can reject a login at a later time by simply removing the line from the authorized_keys2
file.
I recently switched from the Dell-exclusive club of laptops over the past 15 years to a ThinkPad. Specifically, the Lenovo ThinkPad Helix. It was a unit I have been waiting years for to check all the right boxes.
I haven’t been privy to the IBM/Lenovo keyboard wars. I have always heard great things about the IBM ThinkPad keyboard. Well, it seems this Lenovo Helix came with the newer style of only one row of Function keys + hardware-specific keys (volume, brightness, etc). Fine by me as I figured out how to lock in the Function-mode-always (a BIOS option).
But now I had a serious problem when coding/writing long documents…
Why in the hell would the End/Insert key swap functions when I lock in the Function-key mode of the F1-F12 keys?
This was almost a deal breaker. Only after crawling the Lenovo forums (a great place to find hacks for Lenovo) did I stumble onto a Lenovo ThinkPad keyboard hack to reverse the key functions. It actually remaps the Windows keyboard layout in the registry, an age-old trick I forgot about over a decade ago!
Instead of supplying a download of a .reg file, which I am not even sure that GitHub supports, I’ll explain the instructions on how to create your own .reg file.
New -> Text Document
1 2 3 4 |
|
lenovo-helix-end-insert-key-swap.reg
merge
it into your registry. You will need to be logged in as an Administrator.Now, the function of the End/Insert will be swapped.
Also, devoted fans of the previous Thinkpad keyboard: you may want to take your anger here.
]]>In honor of NYCxDESIGN—New York City’s official citywide celebration of design—the MoMA Design Store is pleased to present a suite of products brought to life by Kickstarter. By involving the public in the creative process, Kickstarter uses the power of community to help designers take great ideas from concept to reality. MoMA Design Store is proud to honor these individuals and their designs as examples of how everyone is capable of making incredible things.
This came across in my inbox today and immediately jumped in.
3D Doodler, come to me! The book lamp and recyclable USB sticks, 4x 8 GB, are also on my list.
]]>This showed up in my twitter feed; so, I gave it 30m of my life and I am glad I did.
#HatTip Xander Sherry
]]>1. The actor who played Obi-Wan Kenobi, Alec Guiness, thought of the Star Wars films as “fairy-tale rubbish”.
2. Despite this, he negotiated a deal to earn 2% of the gross box office receipts for the movies he appeared in, earning him over $95 million.
3. Harrison Ford was paid $10,000 for his performance in Star Wars: Episode IV - A New Hope.
4. Peter Cushing, who played Grand Moff Tarkin, found his costume boots so uncomfortable that he wore slippers during many of his scenes, and insisted his feet just never be in the shots.
5. The sound of the TIE Fighter engines is actually the sound of an elephant call mixed with the sounds of a car driving on wet pavement.
6. Steven Spielberg made a bet with George Lucas for a percentage of the Star Wars films, which has earned him millions of dollars since.
7. While shooting the scene in the trash compactor, Mark Hamill held his breath for so long that he burst a blood vessel in the side of his face. They had to adjust framing while shooting the rest of the scene to avoid showing the blemish.
8. Many of the buildings constructed to be used in shots of Tatooine are still standing in Tunisia. In fact, some of them are still used by locals.
9. Denis Lawson, who played Wedge Antilles, is Ewan McGregor’s uncle.
10. Luke Skywalker was originally going to be named Luke Starkiller, and retained the name up until the film begin shooting. Luckily, the name was never mentioned, so it was changed to Skywalker with little effort.
11. The starship that became the Blockade Runner seen at the beginning of Star Wars: Episode IV - A New Hope was the original design for the Millennium Falcon.
12. The Jawa language is based on a sped-up version of the Zulu language.
13. The language Greedo speaks is a South American language called Quechua.
14. The bounty hunter Bossk’s clothing is a recycled spacesuit from Doctor Who.
15. Yoda’s species has never been named.
16. Mark Hamill was in a bad car accident before filming started on Star Wars: Episode V - The Empire Strikes Back, causing severe facial trauma. The scene in which Luke Skywalker is mauled by a Wampa was added to account for the scarring on his face.
17. Yoda was originally going to played by a monkey carrying a cane and wearing a mask.
18. During the evacuation of Cloud City, you can see an extra running with what appears to be an ice cream maker. The extra has since been given an elaborate backstory, and the supposed ice cream maker is meant to be a database of contacts within the Rebellion.
19. The word “ewok” is never said out loud in the Star Wars movies.
20. Luke’s lightsaber in Star Wars: Episode VI - Return of the Jedi was originally going to be blue to match the lightsaber he lost in the previous film, but George Lucas was worried that it would confuse audiences, and thought a green lightsaber would look better, so he made the change.
21. At one point, Star Wars: Episode VI - Return of the Jedi was going to be called “Revenge of the Jedi” and there were actually trailers and posters produced with the original title.
22. In fact, the producers of Star Trek II: The Wrath of Khan changed the name of their film from “Revenge of Khan” to avoid confusion between the two films.
23. The bounty hunter droid IG-88 was actually built from recycled film props. His head is the drink dispenser from the cantina scene in Star Wars: Episode IV - A New Hope.
24. Three of the aliens seen on Jabba’s barge in Star Wars: Episode VI - Return of the Jedi are named Klaatu, Barada, and Nikto. Their names are a referenced in Army Of Darkness as the words one must say to destroy the book of the dead. The names themselves are a reference to the words that must be spoken to shut down the robot in The Day the Earth Stood Still.
25. While filming Star Wars: Episode VI - Return of the Jedi, the codename for the project was Blue Harvest, which was supposed to be a horror film with the tagline “horror beyond imagination.”
26. The cast actually seriously considered making Blue Harvest when a series of sandstorms halted filming for several days.
27. Blue Harvest is a reference to the 1929 novel “Red Harvest,” which was the inspiration for the film Yojimbo, which itself was inspiration for the Star Wars films.
28. In one draft of Star Wars: Episode VI - Return of the Jedi, Obi Wan Kenobi and Yoda were going to leave the Force, and return to their physical bodies again to either assist Luke in his confrontation with Darth Vader and the Emperor, or to join him during the celebration on Endor.
29. Star Wars: Episode I - The Phantom Menace was labelled as “The Doll House” when it shipped to theaters.
30. No physical clone trooper outfits were actually produced for the films. Every clone trooper seen in the Star Wars films was created with CGI.
31. The communicator Qui-Gon Jinn uses is actually an altered Gillete Sensor Excel women’s razor.
32. Samuel L. Jackson claims that the words “bad motherfucker” were engraved on the lightsaber he used in the Star Wars films.
33. While filming lightsaber fight scenes, Ewan McGregor kept getting carried away and making the sounds of the weapon himself, which had to be removed in post-production.
34. Tupac Shakur auditioned for the role of Mace Windu.
35. An early draft of the Star Wars saga began with “This is the story of Mace Windu, a revered Jedi-bendu of Opuchi who was related to Usby C.J. Thape, a padawan learner of the famed Jedi.” It wasn’t until Star Wars: Episode I - The Phantom Menace that Mace Windu and Padawans first made an appearance.
36. The waterfalls cascading around the capital city of Naboo was actually salt.
37. Star Wars: Episode II - Attack of the Clones was labelled as “Cue Ball” when it shipped to theaters.
38. The cow-like creature seen grazing in the fields behind Anakin and Padmé in Star Wars: Episode II - Attack of the Clones can be seen again as an asteroid later in the film.
39. The members of NSYNC made a cameo in Star Wars: Episode II - Attack of the Clones to appease George Lucas’ daughters, but the scene was cut from the final version of the film.
40. Ahmed Best, the actor that plays Jar Jar Binks, makes an appearance out of costume in the background of one scene.
41. So does Anthony Daniels, who plays C-3PO.
42. George Lucas’ daughter Katie Lucas appears as a Twi’lek dancer in Star Wars: Episode II - Attack of the Clones.
43. Her sister, Amanda Lucas, appears as a background extra.
44. Their brother, Jett Lucas, appears as a young Padawan in the Jedi archives.
45. Star Wars: Episode III - Revenge of the Sith was labelled as “The Bridge” when it shipped to theaters.
46. While standing in on the Galactic Senate, Jar Jar Binks votes in favor of Order 66, leading to the destruction of the Jedi and the rise of the Galactic Empire. Even more reason to hate him.
47. The top-down shot of a severely burned Anakin Skywalker near the end of Star Wars: Episode III - Revenge of the Sith has the character framed within the symbol of the Galactic Empire.
48. The in-universe name for the genre of music heard during the cantina scene is “jizz.”
49. Anakin Skywalker/Darth Vader meets six of the nine diagnostic criteria for Borderline Personality Disorder, which is one more than is required to make the diagnosis.
50. Lucasfilm has someone on staff whose job is just to maintain Star Wars canon.
51. E.T.’s alien species are part of the Star Wars universe. A delegation of the aliens can be seen in the Galactic Senate.
52. In an early draft of the Star Wars story, R2-D2 speaks standard English, and is actually kind of a jerk.
53. George Lucas came up with the name R2-D2 while filming American Graffiti. A member of the sound crew asked him to retrieve reel #2 of the second dialogue track, which in the parlance would be, “Could you get R2-D2 for me?”
54. The phrase “I have a bad feeling about this” is said in every film.
55. There’s an island nation called Niue that accepts collectible Star Wars coins.
56. Every Star Wars film has been released the week after George Lucas’ birthday on May 14.
57. Anakin Skywalker/Darth Vader has been played by six different people: David Prowse, James Earl Jones, Bob Anderson, Sebastian Shaw, Jake Lloyd, and Hayden Christensen.
58. A disco version of the Star Wars theme became a No. 1 hit in 1977, and held the spot for two weeks.
And as a bonus, #32 …
#HatTip Todd Major
]]>Vibram USA, the company that makes FiveFingers running shoes, has agreed to settle a lawsuit that alleged the company made false and unsubstantiated claims about the health benefits of its glove-like footwear. According to the court filings, Vibram settled to put the matter to rest and avoid any additional legal expenses. “Vibram expressly denied and continues to deny any wrongdoing alleged in the Actions, and neither admits nor concedes any actual or potential fault, wrongdoing or liability,” read the court brief.
Valerie Bezdek brought the class action suit against Vibram in March 2012. She filed her complaint in Massachusetts, the state where Vibram’s U.S. headquarters are located. Bezdek alleged that Vibram deceived consumers by advertising that the footwear could reduce foot injuries and strengthen foot muscles, without basing those assertions on any scientific merit. “The gist of her claim is that Vibram illegally obtained an economic windfall from her because it was only by making false health claims that Vibram induced consumers to buy FiveFingers shoes, and to pay more for them than they would have otherwise[.]”
I get the whole false claims thing that it could reduce foot injuries which wasn’t based on any facts. Just seems silly to see lawsuits like this after all this time based on mis-representation in advertising. America, the land of the litigated.
A quick Google for Valerie Bezdek shows someone proud of her FiveFingers shoes.
Personally, I cannot live without my FiveFingers shoes. I’ve had them for a little over 2 years now and keep using them (I got the extra durable ones). Before getting them I was already running barefooted on the balls of my feet, for proper technique. I got these and they have allowed me to run in more places – again, on the balls of my feet, not my heel.
I can easily see those that don’t run on the balls of their feet getting injuries.
In the end, if you want to submit a claim the url will be:
http://www.fivefingerssettlement.com
In addition, it seems people who wear these shoes are thought of as snobs? Give me a break.
#HatTip Todd Major
]]>It’s not very likely you’ll make “World’s Greatest Dad”
If you can’t entertain a child without using an iPad.When I was a child I’d never be home.
Be out with my friends on our bikes and we’d roam.
And wear holes in my trainers and graze up my knees
And build our own clubhouse high up in the trees.Now the park is so quiet it gives me a chill.
See no children outside and the swings hanging still.
There’s no skipping, no hopscotch, no church and no steeple.
We’re a generation of idiots, smartphones and dumb people.
I remember an NPR segment from around ~2008 when I moved to New York hot on the heels of the 2nd generation iPhone, the 3G. It talked about our society was already significantly affected by the 1st gen iPhone in that we were becoming a race of robots, always starring down at our smartphone.
It went as far as to say how rude it is to look down at your phone at dinner, or while someone was talking to you. It made a good case about social interactions > your email, to the point of branding you a jackass if you did it.
That segment (sorry, can’t find it) changed my view entirely on social interactions and made me overly conscience on my “mobile use”, along with observing others and their “mobile habits.”
I tried not to be the asshole that said, “Hey, put down your phone and look at me.” Instead, I used other hints that were in the NPR segment such as when noticing someone is paying attention to their mobile device and not looking at you while you are talking, just pause your sentence. You’ll find out that on average 5 seconds go by until they “Look Up.” Or, you could simply offer a visual clue that they have to focus on.
I am happy to report that after 6 years of this, I find myself placing my smartphone on the table yes; but, I do not do this to monitor it or look at it. I do this to get the huge 5” screen bulk + bumper cover out of my pocket so I can sit down. I place it face down so not to disturb me and to give complete focus to the person(s) I am sitting with. I am happy to report that some even have had taken notice and started to do the same, even coming back to report to me how it changed their social interactions.
Fast forward to my nearly 3 year old daughter I have now, and this video. I’ve reviewed the results of quite a lot of studies on child raising and these tablets and smartphones. It basically came down to one thing:
Make it a learning experience for the child and learn together with them. Do not use as an entertainment device and do not leave them alone with it.
In addition, I take my daughter to the playground in the park often. The vast majority of the time, there are no kids – we are the only ones there. We experience the swings hanging still all too often – until we jump into them.
~E
#HatTip ForgetFoo
]]>The core principle in creating a potentially enormous website that will last forever is to get the information architecture right in the first place. This involves knowing your data objects and how they fit together. It should also determine the URL structure, which for Programmes is the most important aspect. Take the URL for Top Gear’s home page:
http://www.bbc.co.uk/programmes/b006mj59
After the domain name comes the word “programmes,” which is a simple, unchanging English word. It is intended to describe the object, and is not a brand or product name. Plurals are used so that the URL can be hacked backwards to retrieve an index.
Next is the programme identifier. Note the lack of hierarchy and the lack of a title. Titles change over time, and many programmes do not have a unique title, which would cause a clash. Hierarchies also change — a one-off pilot could be commissioned for a full series. Understanding your objects allows you to recognize what is permanent. In this case, nothing is particularly guaranteed to be permanent, so a simple ID is used instead. Users aren’t expected to type these URLs, though. They will usually arrive through a search engine or by typing in a friendly redirect that has been read out on air, such as bbc.co.uk/topgear. But the key principle of a permanent URL is that inward links are trusted to be shareable and work forever. Cool URIs don’t change.
A clear information architecture defines the URL scheme. A piece of content is given a clear canonical home, where appropriate. Links and aggregations between them then clearly appear.
For a decade I have spent a considerable amount of time getting the URLs right for what the user was looking at. I must have gone through 20 different iterations over the years trying out all sorts of designs, deep linking, “walk the url backwards” and so on.
You can see on my static site blog here that I paid close attention as well, trying out yet another theme. I am on my 4th iteration of a url schema for my blog and it has become a PITA when having to keep redirects working of old urls, especially on this static site with no URL rewrite module.
I almost went the post_id route here on this iteration; but, Jekyll (and therefore Octopress) makes the title url-safe already so I kept it. Besides that, I agree that urls should play a role in your web architecture.
As long as we are talking about it, ASP.NET MVC’s default /Controller/Action/Id
has always pissed me off since I first started using it back in 2007. Coming from a pure-RESTful background, the pure REST urls are more similar to /Controller/Id/Action
so you end up with urls like this:
1 2 3 4 |
|
And so on. Which, actually, falls inline with what the BBC article above was saying.
#HatTip ForgetFoo
]]>I have several friends, CEOs, CTOs and even strangers tell me they can talk and drive, they can text and drive, they are good drivers, etc.
I’ve always rebuttaled that the human brain can only focus on a single context, at any given time.
A quote in this story summed it up quite well:
Earl Miller, a professor of neuroscience at MIT who specializes in multitasking, says this sounds like wishful thinking.
“You think you’re monitoring the road at the same time, when actually what you’re doing [is] you’re relying on your brain’s prediction that nothing was there before, half a second ago — that nothing is there now,” he says. “But that’s an illusion. It can often lead to disastrous results.”
In other words, the brain fills in the gaps in what you see with memories of what you saw a half-second ago. Among scientists, that statement is not controversial. The politics of Google Glass — and where it’s worn — clearly is.
Bingo. And this includes “hands-free” conversations as well as GPS.
Then again, in 30 years we may evolve to actually have our brains multi-task.
#HatTip ForgetFoo
]]>