Please note that this post was migrated to my new blog platform. There may be bad formating, broken links, images, downloads and so on. If you need an item on this page, please contact me and I will do my best to get it from my backups.
I step away from the system, hands nearly numb, being reminded again since 4 years why PCs will always out perform the latest consoles such as the Xbox 360 and Playstation 3. As I finish a two hour session of Battlefield 2 with my old buddies from TCU, I can’t help but to be amazed at the new found graphics tonight I have not seen before because my previous systems could not handle HDTV and full graphics.

Stepping back, a bit dumb-founded, I question my sanity in the PC I just built tonight. I justify it quickly when I consider the tiny investment it took to bring this desktop to be the game-crushing machine it is now. Only this time it is not my 4.2 Ghz 1200mhz FSB desktop – it’s my $900 Dell Inspiron E1705 work laptop that I spent $240 upgrading.
I have been a long-time advocate for Dell machines back from my IT Administrator days in Atlanta at CASE Masters and iDealmusic. Dell laptops in particular have had an interesting reign. Back in 1998, PC Magazine started to issue the “Drop Test” against the leading laptops. Being dropped from six feet, all laptops failed to boot up except one – the Dell Latitude series which was a business-class unit. It was my first laptop I bought, and still have it. I was using it all the way up to 2005, lastly for automotive tuning.
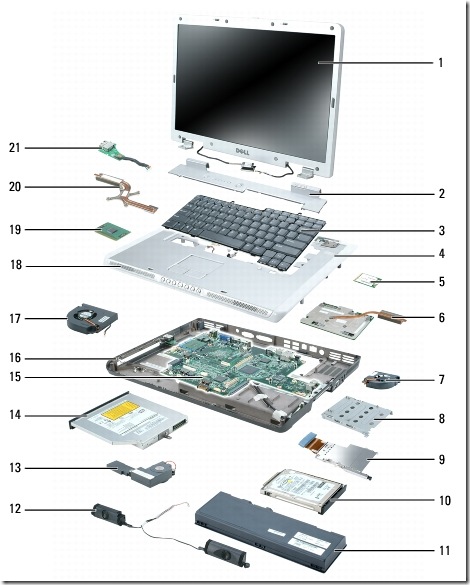
Dell Inspiron E1705/9400 Exploded View (source: support.dell.com)
This story starts with the Dell Inspiron E1705 or also known as the 9400. Dell has done something great here, a laptop that is user-serviceable and user-upgradable. Yes it is a discontinued laptop, but if I only have know when I had it back at Telligent there would have been some serious modding going on. Tonight, I ventured into wild with a few components and upgrades not normally available. Each one has its own story to tell.
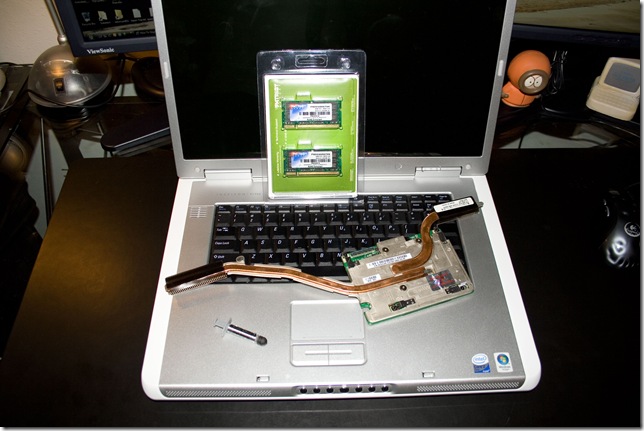
E1705, 4 GB SDRAM, nVidia FX2500 7900GTX 512MB, Arctic Silver 5
4 GB SDRAM PC2-5400 667mhz
The first thing many will cry fowl on here is, “The Inspiron E1705/9400 does not support 4GB of ram.” This is untrue. While yes the bios only sees 3.25 GB available, so does the M17xx XPS systems and many desktop motherboards. There are lots of theories to this, but the truth is that your peripherals reserve that memory space and Windows allows them to over 3 GB - even if they never will use it. Basically, they are powered but never used. Using PAE causes some mobo/bios combinations to free up that address block to 4 GB, allowing for up 4.5 GB to be used. But the sad fact is there isn’t much you can do right now when it’s restricted at the hardware level.
Me? I figured it was a good $61 investment for my next laptop to have 4 GB as well. :)
nVidia quadro FX2500m 512MB, 7900GTX GPU, PCI-E CAD and Gaming Card
Another thing many will deny is the ability to stick an XPS or M90 “high-end” design cad and/or gaming card into the ‘low-end” Inspiron business-class line. As you can see below, this is not the case either and the installation is pretty straight forward. The M90 designer-cad graphics card is the nVidia FX2500m quadro, which is a modified version of the 7900 GTX 512 MB (from my research).
The forum gurus are spending $350 to $500 on this particular card. I snagged mine from eBay for $160. The theory here was if it truly performs as well as the desktop version, then I can finally, after 4 years of planning, downgrade my PC to our Vista MCE machine in the main room and move to the laptop full-time (mobile again!). That is precisely what the PC was built for, less the water-cooling rig which actually is built to handle the heat demands for the next 5 to 7 years of CPUs. So bring ‘em on!
Dell 150w PA15 Power Adapter
Most Dells these days come with an 90w. While this one sufficed for the first few hours of gaming, I did notice the unit getting much hotter than normal. Others amongst the net have mentioned that a 130w or 150w is needed because the 90w will burn out with these upgrades. So I ordered an original Dell PA15 new in box from eBay for $20. I needed a 2nd adapter anyhow. But be warned - they don’t call these things a “brick” for no reason. This thing is literally the size of a brick!
Overclocking
I do not think I will be overclocking, but yes it is true. People are dramatically overclocking their Dell laptops. At this time the E1705’s CPU, bus, and memory can not be overclocked (except the memory timings). But the GPU (graphics processor unit) can be if it is the nVidia series, and quite extensively too!
Arctic Silver 5 Thermal Paste
I only mention this because the other gurus on the forums have been putting this into their systems for the CPU upgrades. I have used AS5 for many years now, and I swear by it. My 4.2 Ghz desktop machine idles @ 28C and peaks at 37C with both cores maxed. That is just amazing (plus the water cooling).
So in this venture I decided to break out the old tube from the freezer and slap a dab on the CPU. The result was more than I expected with only 15 minutes of work, and well worth it. So let us begin the photo slide show with commen[dy]tary.
I was browsing one day and wanted a temperature reader for my laptop as I was noticing the fans kicking on high and the keyboard running quite hot at times. I stumbled upon Notebook Forums and was amazed at the level of upgrades people have done to their laptops from all brands. It seems the manufacturers have finally gave up and allowed end-users the ability to upgrade their machines. You can read up on your brand there.
Reference
For the Dell E1705 upgrades, there’s numerous threads:
- Initial story of upgrading to the 7900 GTX
- Overclocking the nVidia cards
- Their own mini FAQs page, such as cooling and fan control
Preface
This post is not meant to be a complete guide to installing the hardware. Instead it is more of a visual verification cue of some modifications (read cutting) that you must do. Check out Dell’s support page and view/download the service manual as it has very detailed, step-by-step instructions to opening and servicing your laptop.
So now let us break this thing open…
Hinge Cover Removed
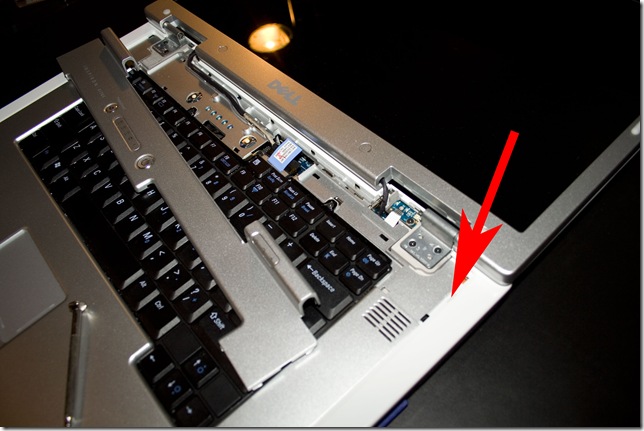
First thing the service manual says is to remove the hinge cover as shown above. It was a bit nerve racking to pry that hard on a piece of plastic, and having it pop - sounding like I was breaking each and every tab. Being the first step in the entire process, I did have a reservation. But pushed on, prying harder, knowing it would come off cause the manual said so.
This is the most difficulty step. Get past the cracking, creaking, and popping sounds and you are home free.
Tip: If you do not have a plastic scribe, you can use a small/tiny flat-head screwdriver but do not pry up as the manual says because this will scratch the white plastic. Instead, use a twisting motion to pop the panel up and loose at the location of the red arrow. Then slowly work your way around the corner, twisting and popping the rest loose. Once you can get your finger under it, pull up and don’t be scared.
Keyboard Removed, ATI visible
Next comes the keyboard. Nothing special here. I just wanted to show you the first glimpse of the ATI X1400 video card to be removed.
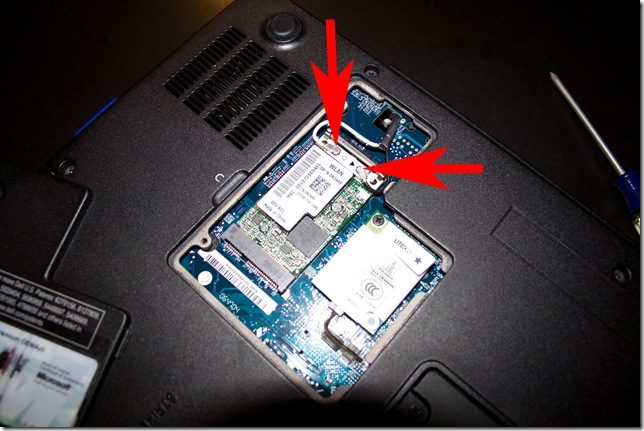
Dell 1500 802.11n WiFi card and Antenna Leads
Skipping ahead, along the way of removing the LCD panel it says to disconnect the wireless antenna of your wireless card. Here you can see the antenna leads connected to the Dell 1500 802.11n card via the red arrows. There is some questions on the web to even having to do this step if you do not have a wifi card. The answer is yes, they are just connected to dummy terminals.
And yes, if you put things back together and have no signal on your wifi card - you forgot to connect these!
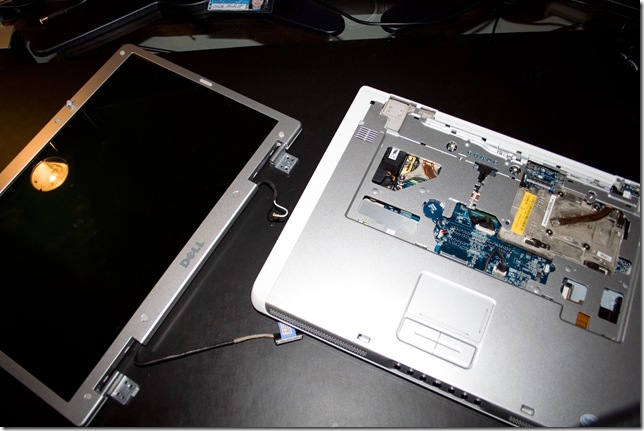
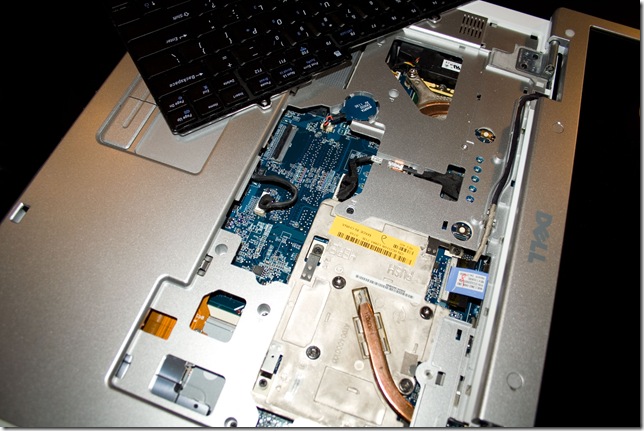
LCD Panel Removed
With the LCD removed, you’ve passed the point of no return (or now you are fully committed rather).
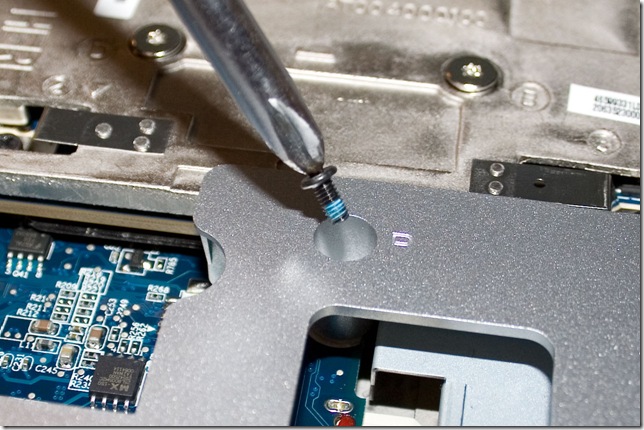
Magnetized Screwdriver Helps
This shows a little trick I have been using since I was a younglin’. I have a special set of tools that are magnetized, allowing me to remove (as shown) and install screws in very difficult places. Tools like this screwdriver pulls the screw right out, not having to flip over the system and let them drop and bounce.
It is very easy to magnetize your existing screwdrivers. Mr. Wizard showed me how when I was just a kid, and I have been doing it every since. Simply take a strong magnet and place it on the tip. Now slide it down the shaft, away from the tip in only one direction - do not twist the magnet around the shaft. This polarizes the shaft with the electrons that were resting at one end now oppositely charged at the other end of the shaft (because you moved the magnet). You can also de-magnetize by reversing precisely what you just did (place the magnet at the far end, and slide it towards the tip). This does not always work because you need to be using the same pole (North or South) of the magnet that when you started. Using the opposite pole will not have much effect.
Do not worry. Just slide the magnet down the shaft and be done. And do not magnetize all of your tools. Just two or three select screwdrivers, and keep them away from your other tools so they do not magnetize others. Note that I highly recommend the use of rare-Earth magnets as they are extremely strong.
And before you ask, yes I removed the HDD before using tools that were magnetized.
Above: nVidia quadro FX2500m, Below: ATI X1400
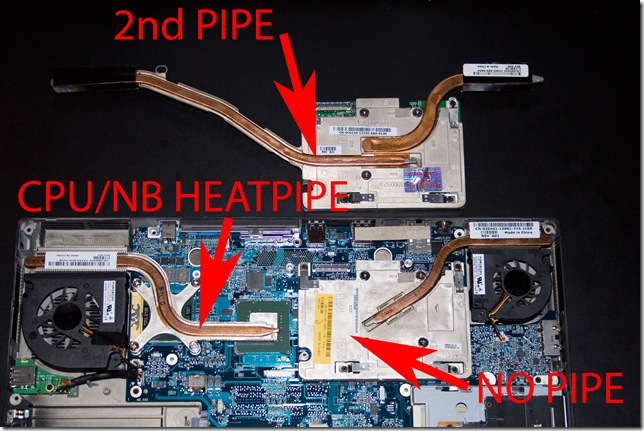
Here is the view of the ATI X1400 still in the system and the new nVidia FX2500m for comparison. Notice there is no heat pipe on the left side of the ATI card, only the right side.
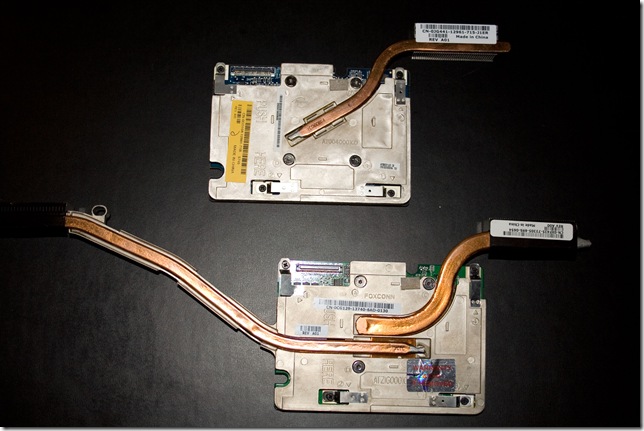
Above: ATI X1400, Below: nVidia FX2500m
Here you can see both cards and really see what others are calling “dual heat pipes” on the nVidia 7900 GTX (below).
Modifying the case to fit the FX2500m
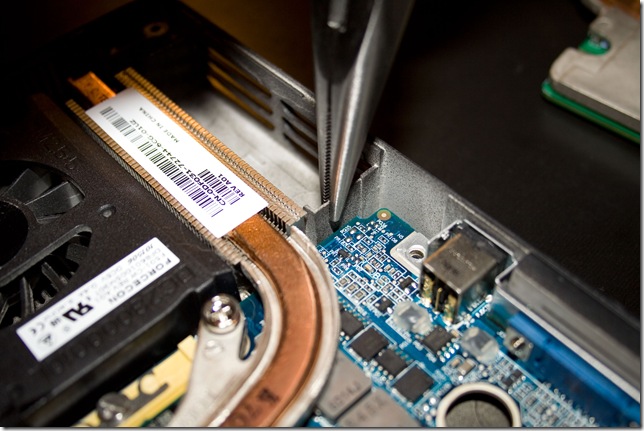
Now for the point of no return. To get the nVidia FX2500m to fit, you will need to modify the left-rear area of the laptop case behind the CPU’s heatsink. This is because the left heatsink for the FX2500m is too wide to fit into this area. So you have to grind down or break off the two plastic sides/tabs. You can see in this photo above that I am grabbing one of the tabs to break off with a pair of needle-nose pliers.
Another option that would keep your full warranty would be to modify the FX2500m’s heatsink by grinding down the two ends. I believe this would fit well with slight bending on the copper pipe to raise the heatsink about 1/8”. This does not block air-flow for the cpu’s heatsink, and still is vented to the rear outlet. Alas I do not have a grinder here, or I would have done it myself.
Do not worry about warranty here. If you are going this far, then you have the ability to service the laptop yourself if a component fails during your warranty period. Dell’s “low cost” warranty is parts-only, and there ya go. Dell will send you the parts to replace, which you can service it yourself - under warranty. Just I would not take the chance of sending the entire laptop in for repair as they may catch the broken tabs.
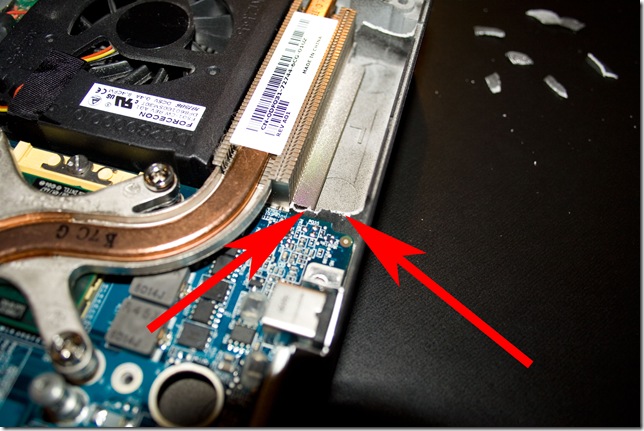
Right Tab Modified
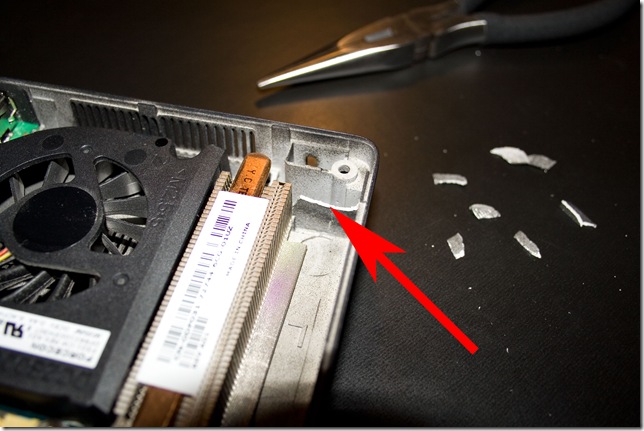
Left Tab Modified
You can see above it does not take very much. Test fit the FX2500m a few times though to make sure you removed enough.
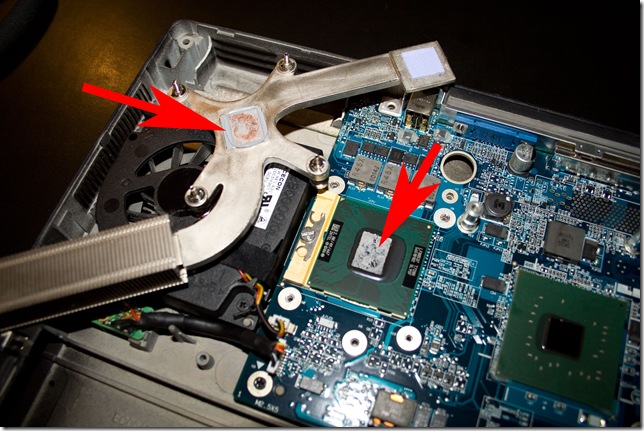
CPU & Northbridge Heatpipe/Heatsink Removed
While I had my system apart, I made plans to upgrade the CPU’s cooling a little with a touch of Arctic Silver 5 as I noted above. You can see in this photo above the crap that Dell (and most PC makers) use on their CPUs. Mine had actually turned into a brittle paste.

Before you can apply AS5, you must thoroughly clean both surfaces (the CPU and heatsink). My best experiences has always been to use rubbing alcohol with some lint-free clothes or even kitchen paper towels. AS5 works smaller than you can see, filling the microscopic gaps and imperfections of the two pieces. Above you can see how the CPU’s surface is now mirror-like, reflecting the white water-bottle cap.
The copper heatpipe was another story though. It was extremely rough and the paste was near-impossible to remove. Sorry I forgot to snap a photo of my work, because of the time involved I was just in a hurry to get it polished down. But I ended up using 400grit sandpaper, than 1000grit, and 2000grit to get a near-polished surface. You do not have to do any of this to your heatpipe though. Just get it cleaned off.
I went this route of applying AS5 and polishing my heatpipe because I did not like my CPU’s temps under normal conditions just idling and/or working. I wanted to cool down the 62C idle of my CPU! I am proud to say that using AS5 did the trick. My idle temps are down to 37C with ambient about 74F. For comparison, my 4.2 Ghz desktop noted above idles at 28C but that’s not fair given the custom cooling I did with it. But, it’s close!
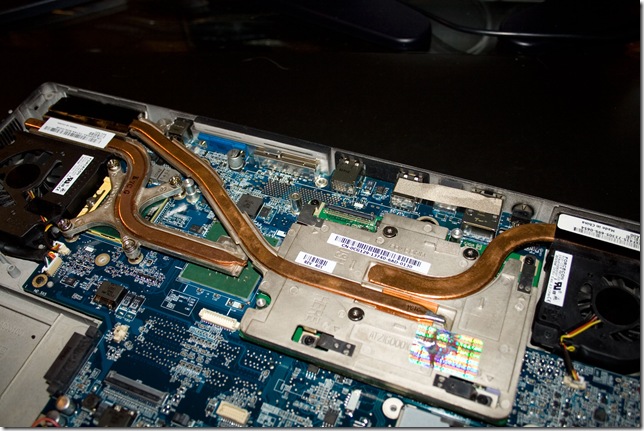
CPU heatpipe and new (used) FX2500m all installed
Here is a shot of everything re-installed and tightened down. Note in comparison to a photo above of the ATI X1400 in the system.

Now this was something I was not happy about. There is a large gap from the left fan (fan 1) to the CPU’s heatsink from before. Then there was now a gap between the CPU and GPU’s heatsinks.You can see in the picture above the screwdriver that is clearly visible (click the image for the full-res version).
In my history of custom cooling back in the 80s and 90s, there is one thing I learned that always remains constant: airflow is key. So my task would be to modify the airflow to force all air through the heatsinks by not allowing any to escape the airflow path through any gaps.
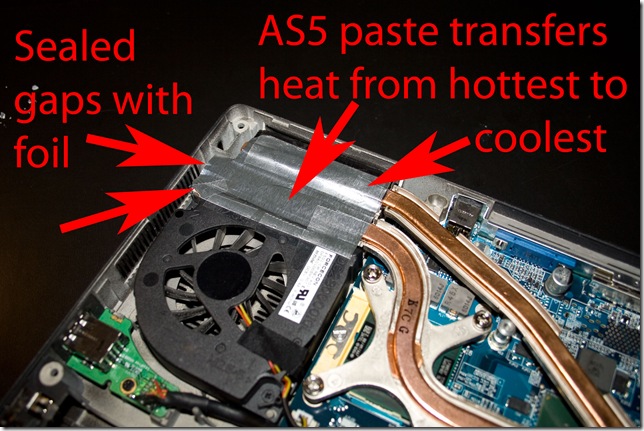
Aluminum Foil Shrouds
I accomplished this by using a few pieces of kitchen aluminum foil, scotch-tape, and additional AS5. There are multiple reasons for this. First for safety I evaluated the entire area and found no electrical components or circuit boards anywhere near this area. You do not want a piece coming loose and short-circuiting things!
Second is having aluminum foil allows the heat to transfer from one copper pipe to the other (just a tad though, too thin really to do a massive amount).That may not have been the best idea at first because CPUs usually run cooler than GPUs from my overclocking experience. But considering how freakin’ high my CPU temps were before I even began, I could only see this as helping to offload some heat to the GPU’s heatpipe – even if just a tad amount, anything had to help.
I also closed down the air escaping on the left side of fan’s outlet to the CPU’s heatsink, as well as the gaps between the two heatsinks. Now all air is forced by the fan trough the CPU heatsink, and then through the GPU’s heatsink where it than only has room to exit the back vent.
 CPU idle at 36C using Arctic Silver 5, down from 62C when OEM
It is very well worth it, even if I did not upgrade the GPU, because now my CPU temps are a steady 37C with fans set to low. With no fans, it creeps up to 47C. Compare that to the 62C idle before with fans on high, and I think I came out ahead.

CPU cores pegged reaches 72C after 30 minutes of stress-testing, down from much much higher
And for you guys into max CPU heat testing, using an instance of Prime95 on each core yields a max temp of 72C with 74F ambient after about 30 minutes. Much better than before! I will admit I did not pay a lot of attention to the max temp before the AS5 was applied. Let us just say I did not stress it for very long once it climbed to 85C.
While gaming the GPU hovered around 63 to 65C tonight after about two hours, and peaked at 70C just for an instant. I would have applied AS5 to the GPU’s heatsink but I did not have a torx-bit small enough (it was missing from my collection) and I wanted to get my laptop running again after spending that time sanding down the CPU’s heatpipe.
In conclusion, I feel this was very much worth the effort. A few hours of research over a few days time, finding a great deal on the video card, and planning/preparation before hand, and it all took about 3 hours from start to end (including the sanding of the CPU’s heatpipe).
Not a bad system for under $1,200 with BF2 averaging in Fraps at 85 FPS and BF2142 around 78 FPS steady. Why someone would pay for an XPS system is beyond me. Just get an Inspiron for a good price, hunt around after a few months find a deal on the upgrade parts.
Now, if I can get my hands on one of those newer 1720/1730s with dual HDD bays…